
I was planning on taking a break on the blog this summer and I kind of did....almost!
But when sweet sweet Delia from Delia Creates asks you to make a remix of her brand new Pleated Pencil Skirt Pattern....well, then you say yes.

I immediately knew that I wanted to make a dressed down version because I love to sew clothes that I know I will use the most.
(I am dreaming of a sequin version too though but that is a whoooole other story.)
The fabric is a narrow blue and white striped firm cotton - which turned out to be hard to photograph, argh!
I also added a zipper. Some might say that a visible zipper dresses up a garment and they might be right. But it also adds a cool vibe and I like that.
Further down in the post I will give you all the information and photos you need to add a visible zipper to this, and any other, skirt pattern. From changing the pattern, drafting some extra pattern pieces so you can sew and end up with a great finish.

I also added some pockets. I already have a general 'Adding Pockets to any Pattern'-tutorial HERE so I am not talking much about that today.

The cute little pleat slit detail is from the original pattern.
The only thing I changed on the back pattern piece was moving the back darts a bit closer to center back. Which helps the illusion of a less wide behind.
The more far apart back pockets or darts are placed the wider you look from behind....and I do NOT need that type of illusions, haha.
There is no pattern drafting magic in moving a dart sideways like that....you simply just move it to where you want it - making sure the width and length is the same.
Let's start the visible zipper tutorial, shall we:

The first thing you have to do it measure the width of your zipper, since you will have to do some adjustments to your pattern to accommodate for the extra width that the zipper adds to the skirt plus add seam allowance. Mine was 3 cm (1 3/16") as you can see on the top photo so that made all the calculations super easy. 1 cm (3/8") on each side for seam allowance and 1 cm (3/8") visible part of the zipper.
The photos in the collage above will show you how to do it - step by step.
IMPORTANT: You will need to do the exact same thing to your front skirt pattern piece!
And then you are ready to draft two new pattern pieces. See below:

Technically you do not need a zipper facing or a zip guard BUT it will for sure elevate the final product if you do add those things - you know my usual ramblings about my strong belief, that the greater finish you give your garment, the bigger is the chance that you will get a long-lasting relationship with this piece of clothes.
You do not have to agree and we can still be friends but this is my blog :-)
So in my tutorial you need to make a zipper facing pattern piece (cut x 2 plus put with fusible interfacing on) to cover the edge of the zipper and the front seam of the skirt where the zipper is sewn on to.
The zip guard goes behind the zipper and protects your skin (or tights) from direct contact with the zipper.
The photos above should pretty much show you how you use the already remixed front skirt pattern piece (same way as the front waistband pattern - in other words 0.5 cm (3/16") added to the CF) to draft your two extra pattern pieces.
The pattern pieces you are drafting are including 1 cm ( 3/8") seam allowance (SA) just like the pencil skirt pattern itself.

This pattern is drafted to beautifully follow your curves and leg and it actually narrows back in again below your hip. I LOVE that look on others but I am not crazy about it on myself. I have quite the pear shape - which means quite a big difference in waist and hip measurement and I believe that the shape that fit my figure the best is a more straight down line from my hips....which is why sewing your own clothes rocks, right! I can just do a tiny change to the pattern and I am back on track.
I made a muslin first and on that I determined where the skirt hit my widest point on my hip. I found that point on the paper pattern and added some width to the side seam.
And as you can see above with big yellow letters I have a little TIP! to this:
If you add width to your side seams (1) then raise your hem with a curved line (2) to make sure your corner is 90 degrees. This creates a smooth (as opposed to a pointy) hemline when the front and back side seam is sewn together.
I put my ruler on the pattern to show how you that the hem was raised at the corner.....probably not the smartest idea to put a see-through ruler with black numbers on a black background....yeah, 'great'....the ruler just kind of look like a part has been broken off, ha.
Oh well, I think you get the idea, right!!

I already mentioned earlier that I'm not going to talk about the pockets because I already have another tutorial for that (HERE) but I just wanted to show you the pattern pieces I made for this skirt and how I sew the facings to the pocket bags.
In certain projects the pocket bags can be made of the same fabric as the rest of the garments. In this case the skirt fabric was too thick to be used for such a tight fitting garment (they would be visible/bulky through the skirt while wearing it.) So I used some thinner fabric for pocket bags and made facings with the skirt fabric.
Now let's get sewing:
I am only showing you the zipper part because you obviously have to buy the skirt pattern to get the rest of the tutorial.


I forgot a photo of one step.....(I think I need a production manager for my tutorials ...and while we are at it....can I get a photographer too - jeez, the fabric has different colors on all the photos - gah. I never take these photos at the same time of the days and that certainly shows in the colors and some are like blurred too, sorry!)
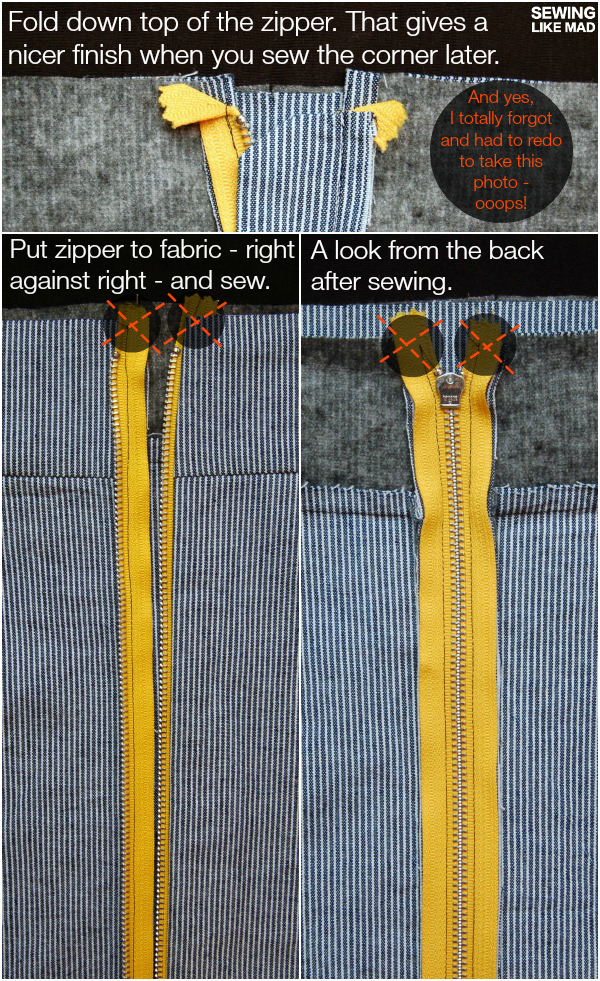
SO the step I forgot to show you is how to finish the side of the zipper facing that is not sewed to the zipper. I simply overlocked the raw edge and then folded the seam super narrow (basically same width as the 3 thread overlock seam) and stitch it down. You could also put bias tape on which would make an even nicer finish but I guess I did not feel like it that day. As you can see above, you have to do that before you sew the top to the waistband and the bottom to the hem.

So you start at the photo to the right - at the hem.....

And you are done, yay.

Sorry, I was debating whether to show you these last inside photos at all because quite frankly you can't really see anything but a lot of stripes, ha.
But I tried my best with a bit of yellow graphic overlays and text to explain what you are looking at.....which is a fine finish with no visible overlock seams.

And here I am in our garden in front of those amazing trees that are blooming everywhere at the moment in the most beautiful colors.
Again, me and my camera are not the best of friends but I wanted to show you the full styling with the yellow shoes too.
I would probably wear this outfit out to dinner with my husband or good friends.
For a more everyday look I would wear a tight-ish graphic t-shirt and some flat sandals.

And at last I have to show you my little balancing act to get these photos with mostly flowers behind me instead of half tree stem and half flowers. Not easy in size 9 shoes, let me tell you that!
Thank you Delia for inviting me to your pattern remix tour!
You can buy your version of the Pleated Pencil Skirt Pattern HERE.
Thank you!
This skirt looks amazing! I love it!
ReplyDeleteThis is the coolest skirt I have ever seen! Wow :)
ReplyDeleteLove it Mie! Thanks for a fantastic pattern remix!
ReplyDeleteI love to read your posts Mie. It's a treat to learn from someone who is as refined in her skill as you. Love the fly placket. So classy.
ReplyDeleteit looks great with pockets and that zipper... fantastic!
ReplyDeleteWow Mie! You look stunning!! The inside of the Skirt looks amazing!! You know I Love everything about it but I keep wishing someday when I'm like 70 or something I'll be able to make something so perfect!! Thanks for sharing another great tutorial! ;)
ReplyDeleteThe zipper is perfect. Fabulous idea. I love an exposed zipper and have meant to add them to everything but did not have the proper technique. Thank you for this tutorial!!!
ReplyDeleteThe skirt looks amazing on you! You are so pretty! Thank you for the tutorial!
ReplyDeleteAwesome Mie! I'm making one for myself, with an amazing visible zipper!!!
ReplyDeleteNatalie
XX
You are so smart! You totally know your stuff and I love that. Mine will not be quite so accurate, but hopefully will still work for people :). Great job, love the skirt!
ReplyDeleteLove this skirt and the pop of color the exposed zipper gives. And seriously, you are just gorgeous.
ReplyDeleteNow I love this skirt! Awesome job.
ReplyDelete