
This month we decided to divide my Sewing Rabbit Creative Team post up in two parts.
On Me Sew Crazy you can get some tips to rethread your serger and unpick your serger stitch the absolute easiest way. If you do not already know these simple tricks they are going to blow your mind (I hope, haha).
And here I am showing you how to with a few steps can transfer your leggings pattern into a pair of stylish but still super comfortable knit slouchy pants.

Before we start the tutorial I just want to add that it is a 'real time' tutorial so I actually ended up with two fittings and extra adjustments before I was satisfied and you are getting it all in the photos below.

1: Start with a basic legging pattern. This one self drafted. But there are several great tutorials for self drafting leggings out there in blog land. THIS one from 'One Little Minute' is very detailed. And THIS one from 'Make It and Love It' is the fast one where you trace another pair of leggings. And if you are not the self drafting type then 'Go to Patterns' have their bestseller Go To Leggings pdf sewing pattern for sale at their web shop HERE. In other words lots of options!
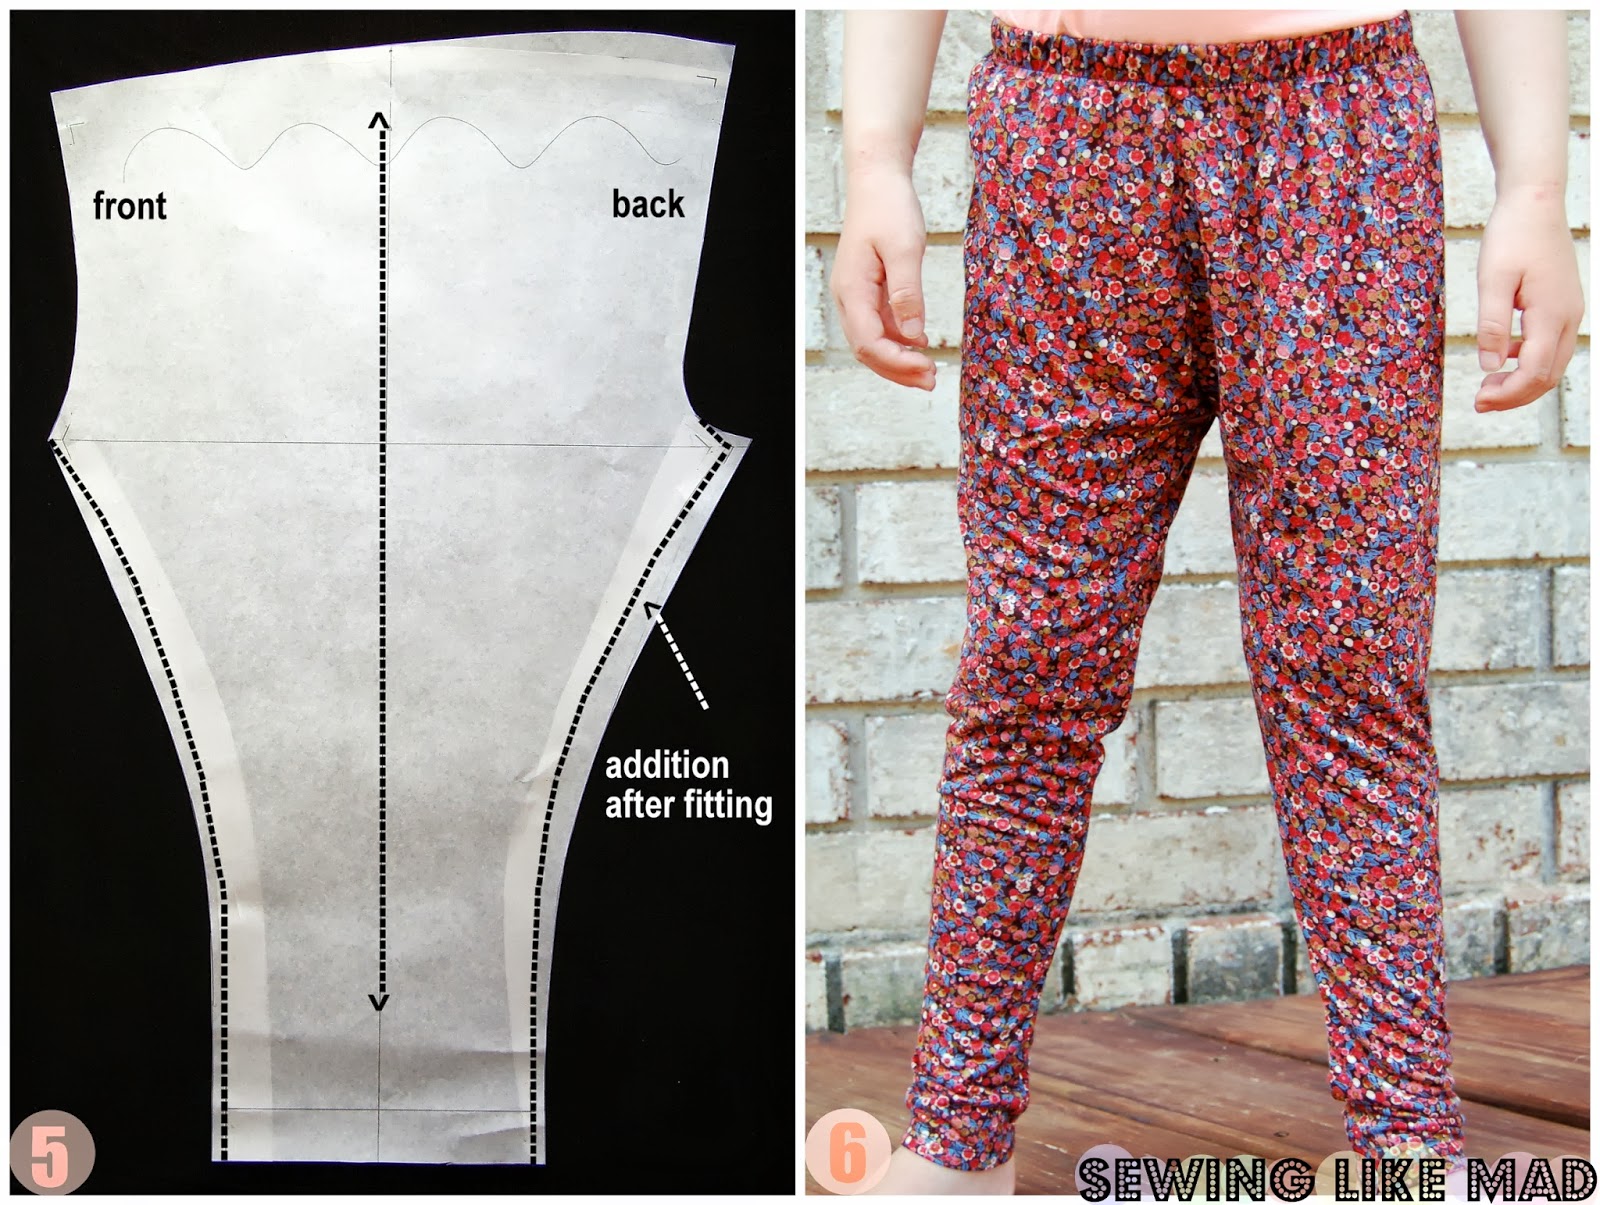
2: The first thing you do is copy your leggings pattern because you have to start cutting into it to add the width. Because I only wanted the width in the thighs I first cut of the pattern around the knee. Then I made some vertical cuts in the top part all the way down to the knee line so that the paper only just stays together with like a thread. And then I spread out the pattern as seen above on photo 2.

3: Then you trace the new shape to a new piece of paper. Don't worry about the curve that happens to the knee line when you spread out the top part. Just reattach the lower knee piece to the spread out top part like photo 2 shows - so the sides are touching. To lower the crotch seam we have to make the crotch seam longer, right! So I am adding 3 cm ( 1 3/16 in ) to the top of the pattern as seen on photo 3. That is much easier than lowering the bottom front and back seam and the result is in my opinion the same.
4: Now I thought I was done and sewed up a sort of a wearable muslin - if they were good that is!
Hmmmm, I was not completely satisfied but I knew I was going in the right direction. The width in the upper thighs was right but they were too tight around the knees. I only wanted them to be tight under the knees.
As a side story this first version ended on my three year old. Since she has shorter legs the thigh width fitted her perfectly (get it? The distance from top to knees are shorter, right!). They are of course too long in the full length but with a few roll ups (or an alteration if Mommy would ever get around to that (don't think so)) and they are good to go!
As a side story this first version ended on my three year old. Since she has shorter legs the thigh width fitted her perfectly (get it? The distance from top to knees are shorter, right!). They are of course too long in the full length but with a few roll ups (or an alteration if Mommy would ever get around to that (don't think so)) and they are good to go!
Okay, carry on now Mie......
5: Here you see what I added to the pattern after the first fitting. I also thought they needed a bit of extra length only in the back crotch seam (sorry, I have no photo of that so you just have to take my word for it.) but since I was already adding to the thigh width I also added a bit to the back crotch seam. In the front I only added to the thigh, knee and a tiny bit to the lower leg.
6: Time for second wearable muslin and this time I was satisfied.

7: I wanted to add pockets to make them more pants alike. So I simply traced my pattern again. This time making a front and back pant pattern piece by simply splitting the pattern at the seam side - just remember to add seam allowance. If you need help to draft a side pocket pattern I have made a tutorial for you right HERE.
8: DONE! These are made in this really soft grey cotton jersey with tiny silver dots from Girl Charlee - seriously where else, right!

That is all for me today. Thank you!

girl, you are making me tired...are you sleeping at all? impatiently waiting to see whatcha been making!!!
ReplyDeleteMie, du tryller. Hængerøv er jo det de unge vil have... i hvert fald Lilly!!
ReplyDeleteGreat tutorial, Mie. Thank you. And great serger tips too. And yeah, seriously, do you ever sleep? :)
ReplyDeleteI just made a pair of these "harlem" pants yesterday... getting more of my sketches done for Sewing for Kindergarten :). I altered my pattern the same way you did and I think your gray polka dot pants came out with the perfect fit! I haven't tried mine on Drew yet so I'm hoping they look that good. (We think so much alike!)
ReplyDeleteHa, that is so funny Chelise! I can't wait to see them. And I don't mind AT ALL thinking like you Chelise ;-))
DeleteThese are so fun. I love that you just slashed and spread a leggings pattern. Good to know that I am not the only one that doesn't get it on the first try. Last pattern I drafted it was the 3rd time before I liked how it looked. I am really excited about your Sewing for Kindergarten series.
ReplyDeleteWith Love,
Scary
These are really stylish Mie. Does the slash and spread also lengthen the crotch seam? I don't think so.I like this because I don't like the droopiness if the typical harem pant. I actually have a similar pair I made myself from a Burdastyle pattern.
ReplyDeleteLoove it! So cute. Follow you, great blog!
ReplyDeleteI definitely could use me a new pair of leggings! Thanks for sharing with us!
ReplyDelete-Jana
<3 this idea!
ReplyDeleteI made the pants like you suggested, opening 5cm in between the slash lines, and i didn't get this loose at hips.... :/
ReplyDeleteHi Carol. I am sorry you did not get the result you expected. As you probably read in my post, I had to try a couple of times too before I got them the way I wanted them. The final result depends on so many things like fabric, size of girl you are sewing for but probably most important the pattern you are starting with. Now you have your first version and know that next time you need to open the slash lines more....or maybe even make another slash.
DeleteLet's not focus on our 'mistakes/faillures' but how we learn from them, right! ;-)
Thank you so much for using one of my tutorials.
Good luck with next version!
Would this alteration work with an adult pattern?
ReplyDeleteWould this alteration work with an adult pattern?
ReplyDeleteI don't see why not! Go for it! :-)
Delete