Sunday, December 27, 2015

The Fishtail Kimono by Chalk and Notch.

Today I have 3 versions of the same pattern so prepare yourself for a bit of photo overload but at least with different colors, textures and details to look at, ha.


As you can probably imagine if you are a regular reader of this blog and know my honest review promise and my super annoying (even to myself) critical eye, it is not very often that I open a pattern and actually start cheering. But I did when I opened the file to The Fishtail Kimono. 
It's not perfect but it is darn close! (and yeah I know perfection is very very subjective so I'm of course talking from my personal perspective!) More details to come along this post....


Let's start with the version that is the most close to the original. 
The pattern can be made both with knits and wovens which so rarely works but in this case totally makes sense because of the loose style and fit.

This one is made with a aqua cotton knit with silver spots from Fabric Depot.


My Janome cover stitch was again hard at work. You obviously do not need a cover stitch to make this style but it was very helpful for hemming, the back seam above the gathering (to stitch it down so it lies flat) and for the neckline and front opening rib.


So this is a near-perfect pattern to me I said, yes I did.
It is just SO full of information and not only information but the relevant kind of information.
Gabriela the designer has worked as a pattern maker before and that shows. The pattern pieces itself also have lots of information on them (e.g. hem SA info) which I absolutely love. Every time I don't have to look in the tutorial for info that I need to know to make the garment makes me a happy bunny.

I also loved the techniques she is suggesting in her tutorial, the use of fusible interfacing, the important notches are there and it is seriously just a pleasure to see such a simple style (nothing wrong with that just to be clear - they can be the hardest to design) be treated with this type of attention to detail!


The only time I was confused was when I tried to figure out the difference between neckband version 1 and 2. That information is in the tutorial but I had to look more for it than expected. Then when I realized that the difference basically was a matter of a button loop (but that very correctly does make a difference to how to cut and sew the neckline) I also understood why that information didn't have a more visible place in the tutorial. In other words this is a tiny detail but I thought I would mention it to avoid you coming in the same situation.


Let's move on to the version with a little twist.
 (Yes, the next version has a bigger twist.)


This one is made from this very soft and stretchy French terry and then with this beautiful neon coral crochet stretch lace from Mood Fabrics on the gathered lower back piece. And I know you are wondering why in the world I choose to put a similar color dress under this lace and make it so much harder to see....and I totally ask myself the same haha. 
I will say to my defense thought that the contrast between the neon lace and the red dress in real life was way more visible than on the photos, gah. But I have done what I could during the editing of these photos and I hope you get an idea of what it looks like!


Just a quick note about the red dress that is in fact handmade too but for unknown reason never blogged. It is the Celestial Tee by Figgy's extended to a dress.


For this version I didn't use my serger at all, only my sewing machine and my cover stitch. The reason for that was the lace. Since the lace is see through I would prefer to have the seams stitched 'away' from the lace so there is no chance of it being visible through the lace. So as you can see on the photo above, the seam above the gathered back piece is stitched up on the top back grey knit piece. And the side seam is stitched towards the front bodice. This is just me being very very detail orientated and you should not hold back making a lace version if you don't have a cover stitch machine, ok! You could just serge the seam and then use your sewing machine to stitch afterwards.


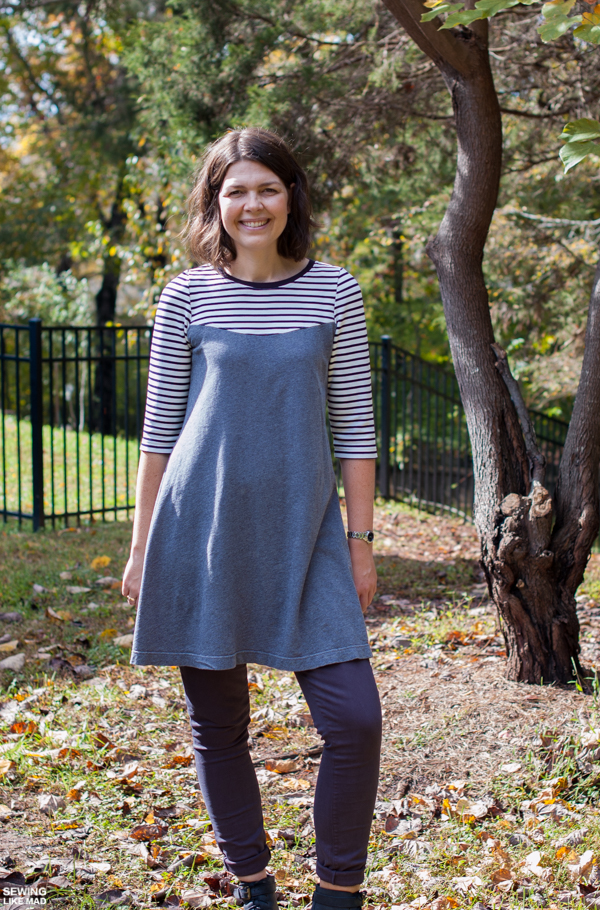
Okay, the last version and I'm literally giddy to show you......

Because it has faux shirt sleeves!!!!

I know you are suppose to be a bit more down to earth about your own genius ideas, bahaha but man I love this detail and one day I WILL make one for myself!


The smoky blue knit is a stretchy Rayon Bamboo French Terry from fabric.com (the same quality as the red dress in the previous outfit) and the stripy woven cotton voile is from Mood Fabrics. This blue color looks like it is sold out but HERE is a link to the other colors. The quality is beautiful!


I knew very early on that I wanted to make a version that mixed knit and woven shirt fabric but it was only during cutting, when I realized that I didn't have quite enough of the blue French terry and had to cut the sleeves shorter, that the idea about adding faux shirt sleeves came.

The pattern drafting is very very simple because you only need two measurements. The width of the kimono's sleeve by the hem (which you measure on the paper pattern) and then the length of the faux sleeve extension. Make a rectangle with those measurements, cut two of those and you are in business.

I thought it would look the best if I sewed the faux sleeve to the kimono sleeve by the hem stitch and not at the very bottom of the kimono sleeve. So if you look at the photo above you can see those 2 cm of the very bottom hem of the knit kimono sleeve is not attached to the woven sleeve. Okay, this is super hard to explain but I think you understand, right!


I finished the woven sleeve with a bias covered slit and a bias tape tie band


For the front I used a knit rib that I cut a few centimeters shorter than the pattern piece (since the pattern piece is not originally drafted for a rib) and I knew the rib would stretch. Sewn on with my sewing machine and then stitched with the cover stitch.


 And can you believe that these denim Ash pants that I blogged about in June are already too short. Argh, kids stop growing!

Okay, so there you have it.....my three versions of the Fishtail Kimono. And I kind of feel like I want to make more. It is a fast (depending on details, ha) and fun sew and you are in very very good hands throughout the process.

Get your own version of The Fishtail Kimono HERE.

Thank you!


Monday, December 14, 2015

All You Need Jammies - Christmas pajamas 2015

Two christmases ago I made these ladies their first christmas dresses and this year I took the plunge and made them their first christmas pajamas.

It's not a tradition I grew up with - probably because Christmas Eve is the big event in Denmark with christmas dinner, dancing around the christmas tree and then finally presents. In other words there are no specific morning traditions.
I love love love the American/British way with presents in the morning and this year it will finally happen in mommy mades. 


And the name of the pattern is to be taken literally.
From this pattern you can make 5 different garments. Gathered and regular tee, leggings and lounge pants plus a gathered nightgown. 
That's impressively generous for little over $8 if you ask me!

And even better the pattern has an easy overview to which pages to print depending on what you need. I love patterns that do that. 


But before I talk more about the pattern, let's talk about this fabric!

There isn't a ton of cotton based knit fabric out there and even less with prints in my taste so I practically jumped when I found this Boxer Reindeer Jersey Knit at the peek-a-boo pattern shop that-now-also-sells-fabric. 
I asked Amy the owner if this would work for pajamas and I LOVE that she was honest and said, "It can be done but personally I think it is a bit too thin for the pants. What about using this great red knit, it would be perfect for pants." I had not even thought of that and I honestly think this is a much better result than the whole outfit in the reindeer print. Thank you SO much for perfect customer service and lightning fast shipping!

The Reindeer print does not have a whole lot of stretch either so the gathered top in this pattern package was oh so perfect.


I feel like these photos are a bit unfair to the fabric. They are taken in the afternoon after the kids had been wearing them since the morning and I don't think you can find much knit that would not have 'knees' in them at that point. We had even been trampoline jumping at this point, haha. It really is great for leggings, promise!


Okay, let's get back to the pattern.

Sizewise the pattern is big - which is not meant as a complaint but just a reminder that you in this case REALLY have to measure your child or do what I did, used an already fitting pajamas to compare the pattern to get an idea of what size to make.

The clear indicator I got that the pattern runs big was when I realized that my tall (90 percentile) almost 6 year old could fit the size 5 (also in length) in the leggings and top. Again, not a problem as long as you remember to measure.

What I do not recommend you to do though is to use a top with lots of stretch to determine size and then afterwards realize that the fabric you are using has little stretch, DUH! 
I had already cut out my size 5 top pattern and went totally rogue and sort of graded it up while cutting...sooooo if you noticed a little center front and back pleat on little sister's neckline you should know that is me fixing my own problems and not a problem with the pattern, ha.

When it was big sister's turn (almost 8 years old with average height and weight) I had (kind of) learned my lesson and made her the size 9/10 in the top (because of limited-stretch fabric) and ahem, then I might have used the size 5 leggings patterns and added a bit of width and length while cutting (at least this time it totally worked....seriously, sometimes 15 years of sewing experience have to pay off, right!?) 


I had a few problems with/comment to the patterns.

You know I from time to time measure my paper patterns before I even start cutting and I found that the sleeve is a bit too small for the armscye. It's not something you would notice when you are sewing it because the fabric stretch and you might not even notice it when it is sewn in unless you have a trained eye (or you saw a comparison between a sleeve that fit and one that is too small) but the feel from the wearer will for sure improve and so will the look if the sleeve fit.
An easy fix is to simply add a bit of width to the sleeve seam and maybe also raise the sleeve cap a tiny bit depending on how much you know about pattern drafting. Or maybe using a sleeve size bigger than your bodice would actually do the trick if you don't feel like doing any changes to the pattern.


Another small thing was the gathered pattern piece (the lower part of the bodice of the tee). It is shaped like a half trapeze shape which means when the side seams are sewn together it creates a pointy side seam. I know I'm anal here and most would just cut it off and make a straight line at the hem but I can't help thinking that if only the pattern piece had been made from a rectangle piece and then using the cut and slash method which keeps the corners in their correct 90 degrees state then no correction would be needed.
I did my little trick and raised/curved the top and hem seam gradually to about 1 cm / 3/8" towards the side seam and created those pesky 90 degrees corners that creates straight lines when you sew them together.

A third thing is the fit of the leggings on the front of especially my youngest (who wear the true size 5 pattern) but I must admit I didn't spend any time looking into possible fixes because hey, this is pajamas that they will sleep in under a duvet, ha.


My Janome Coverstitch was again hard at work and I used it both at the neckline rib, above the chest gathers and to hem the bodice and sleeves. 

And here is a closer look at that silly reindeer.


This photo might be a bit blurred but how could I not use that!? It's funny how photos (or looks on photos) can deceive because they they were craaazy during this first attempt of getting photos hence why we ended up jumping trampoline and only try again outside way later in the day but hey it all worked out in the end.

Get your own version of All You Need Jammies pattern HERE.

Thank you and happy holidays!

Wednesday, November 18, 2015

Japanese Shirt Pattern plus Vertical Button/Buttonhole Placement Tutorial.

The first Japanese Sewing Week has started and I sort of cheated my way into it. But I will tell you about that later.
The series is arranged by my good and talented friend Sara from Made by Sara. You can read all about the series HERE. In that post you can also find a link party so YOU can join in on the Japanese sewing fun.
In the end of this post you will find a great giveaway with prizes such as Japanese Sewing books from Tuttle Publishing and a fabric voucher to Urban Sew.  


You know what a giant fan I am of Japanese Sewing patterns. Not only of the aesthetics but just as much because I 8 out of 10 times agree on the suggested technique - which I find remarkable since techniques can be somewhat of a subjective matter. I'm always in awe of the illustrations in the books. They are clear, precise and informative and 100% make up for the fact that I (obviously) do not understand a word of the Japanese tutorial text.

It was the great and informative Japanese Sewing Book Series on the blog You & Mie that gave me the bits of information that I needed (e.g. the japanese sign/word for CB which is always good to know, right!) to dare to try them out and I have not looked back since. I highly recommend that you start there if you have never tried sewing from them before.


Let's get to my contribution. I have dreamt of making this shirt ever since I saw Celina making it for the Shades of Me series. Find the post HERE.

It is from the book Simple Chic. I also made those two knits tunics I posted about two weeks ago from from that book. 

So how did I cheat myself into the series. Well, you know that I try to stay away from series because they come with a deadline and that does not work so well for me since my blog is a hobby. BUT when I got the invitation I had already made this shirt. It was hanging in my sewing room and was just waiting to be photographed, so that was exactly the kick I needed to get it out of there.

The reason for the procrastination was because I was not sure it turned out the way I hoped. More precise I was worried that the fabric (delicious organic cotton double gauze from Organic Cotton Plus) did not have enough drape for this type of shirt and that I looked more square than you are suppose to in styles like this.

So it was actually only when I looked at the photos that I realized that I actually really like it on me and I have used it many times since, doh!


I changed the pattern a little bit. The book both have a dress and a shirt version and I made something right in between - I guess you can call it tunic length.

It's pattern C and it only comes in one size which took me quite a while to figure out while I looked the pattern sheet over and over haha. So now you are spared that waste of time!

It is a VERY roomy style (and a fabric with lots of drape (silk, rayon etc) would work great with the original shape - just like Celina's.
So after making a muslin and knowing that I would make it with double gauze, I ended up making it quite a lot more narrow. I took 2.5 cm / 1" off the CB bodice piece and then the same from the front center piece. But I took it off on the side that is sewed together with the front side piece not at the very center where the buttons are. (I hope that makes sense?!)
So it became 10 cm / 4" less wide in total. 

If you remove from the center back piece just remember also to adjust your collar piece otherwise it will be too big. In other words you are making your neck opening smaller too.


Here is a look from the back. 
And for the 100th time did I wish I had a stylist with me when I'm taking photos that could just give that collar a hand stroke so it would lie down nicely. Yeah, I know...I'm obsessing over tiny ridiculous details!

I made the shirt version and added length to it. You could probably also choose the dress version and shorten it. (I think the collar fits both since the styles are called C-1 and 2 but I haven't actually checked).
I think I added about 15 cm / 6" to the length in total. I didn't bother to add any width at the bottom even though it would now had to cover my bum because I knew those gathered side inserts would add plenty of width.

I absolutely love those gathered side inserts and I'm almost feeling proud of myself for not color blocking them.....at least this time.


I have wanted to talk about button placement forever and well, this post is as good as any, right. Especially since it contains a garment with buttons, haha.

Buttons are not placed in the middle of a buttonhole. 
I'm going to focus on vertical buttonholes in this post and a button is placed so that the stitches used to sew the button in is holding the buttonhole in place. So you button your shirt and then you pull the side with the buttonholes down (the wearer's right side if you are a woman and left if you are a man) and at the same time pull up in the side with buttons and boom you have a shirt placket that stays in place.


And I know it looks like I totally screwed up the placement of those side pieces with gathers (another thing to think about when placing buttons: lining horizontal lines up across from each other), and I have several times gasped and grabbed my measuring tape but they ARE at the same height. It's simply because of the width of the shirt that it does not always looks like it. I'm the type that could not handle one being higher than the other....I know, I know I need help, hehe.

Okay, back to the tutorial:

SO to measure where to put your buttonholes you start by placing your top button on the garment (where it eventually will be buttoned through a buttonhole and end up being visible). The buttonhole has to start 2 millimeters above the top hole(s) in the button. Use your preferred way of marking buttonholes. I stick a pin through the top hole of the button and then I lift the button off the pin and move the pin up 2 millimeters. (I use slim pins with a tiny head all in metal in case you wondered).

Next step is deciding where you want your lowest button placed. Marking method is obviously the same.

I realize that many women have to start by determine where the button over their bust has to be placed as the very first thing (to avoid gaping over the chest) and then place buttons upwards and downwards from there but the principles are still kind of the same although the math is of course a tiny bit different.

Third step is to decide/determine how many buttons you want on your placket in total. I simply play around with the buttons and see what looks the best. You obviously do not want a too big gap between them and you do not want a too small because that means more buttonsholes to make, gah.

Now that you have determined/decided on total number of buttons, you need to measure from the start of the top buttonhole to the START of the bottom buttonhole, divide with ONE LESS than the total numbers of buttons, mark all your button holes and get started.

Let's do an example:

So if the total number of buttons are 8 like this shirt and the full measurement (from top buttonhole to top of bottom buttonhole) is 60 cm / 24". Then divide 60 cm with 7 (one less than the total number of buttons remember). That will give you the measurement from top to top of each buttonhole all the way down: 60 / 7 =  8.6 cm.

I don't know if anyone need this information or everyone is doing it this way but hey, now it is here!


I also wanted to give you my opinion about when to use vertical buttonholes versus horizontal buttonholes. 
So in my opinion as soon as there is a placket or a stitch creating a placket effect I think vertical buttonholes looks the best.

In other words the only times I use horizontal buttonholes are in blazers, vests or skirts with no stitching along the front. I have two reasons for it and the first one is pure aesthetics (and therefor subjective). The other reason is more practical but since I'm not talking about horizontal buttonholes in this post I'm going to save it for another time, sorry but this post is already long enough, ha.  


Lastly I wanted to give you an example of how to style it for another occasion.... like leaving the house and not pick up kids or go grocery shopping, hehe. I love the contrast of the cropped jacket with the long tunic under. The jacket is from my favorite Danish brand Baum und Pferdgarten and after borrowing it from my sister so many times she finally gave up and gave it to me. Yippie.


Okay, I definitely think I need to stop rambling now and you need to enter this giveaway is you haven't already!


Good luck!


And please check out all the other incredible participants. They truly are an honor to post together with!
There will be links to all the posts on Sara's blog HERE.

Thank you!


Wednesday, November 11, 2015

Halifax Hoodie by Hey June Patterns.

I have been eyeing Hey June Patterns for awhile but I'm going to be totally honest and admit that I have become a bit more hesitant to try out new (to me) pattern makers . I can't turn off my knowledge, my critical eye and my expectations of a somewhat professional level when a product is sold for money and you just never know what you get before you open up that pattern file. I'm not saying that everyone have to make patterns to my standards but that's the type of patterns I personally prefer to work with for obvious reasons.

But I had a feeling I would not be disappointed with Hey June's patterns and luckily I was right. 
This is the Halifax Hoodie.


First of all this pattern is very generous. In other words you get A LOT for your money. A zip up hoodie, a version with the twisted side seams and high-low hem (like I'm showing you in this post) and a classic sweatshirt with normal side seams plus you have the choice of adding either a hoodie, funnel neck or regular rib neckline plus a kangaroo pocket. That is basically 3 different bodice patterns in one package plus the extra add-on details...together that gives a ton of versions...for $10. Wow!


This is my first version and when I looked through the photos the other day I realized I only (literally) had 3 photos that was not out of focus. GAH!! I must have stepped out of the focus zone without realizing and somehow I didn't notice when I quickly liked through them after finishing the photo shoot. Jeez!
I will focus (get it, haha) on the fact that one photo is actually pretty good and the other two I'm only making slightly weird facial expressions. Hallelujah.

SO this is view B from the pattern with the twisted side seams but with added length to the bodice. First of all I started with a size M because I wanted a slightly oversized look and that was the perfect choice.
I added 10 cm / 4" to the length of the bodice pieces while cutting. I was worried that the longer length would collide with my hips so I also added a bit of width (5 cm / 2" total) to the lower part of the front bodice (green knit quilt / sherpa in this post).
The original pattern has two bottom rib pieces for view B - one that fits to the big back and half front bodice and one smaller one that fits the half front bodice. I moved my rib seams to be on my side although there is no side seam to match up. This is just a matter of taste and what I preferred. No biggie and easily done. I obviously had to make my bottom rib bigger anyway since I widdened the bottom circumference for my FBA (Fat Butt Adjustment - thank you Alida for that one).


The green quilted knit is from Miss Matatabi. The green is sold out now but she usually have some sort of quilted knit in stock. I have been saving it for the perfect project and this was IT! The heathered black French Terry is from Girl Charlie. This has sold out but they now have something very similar HERE (I know because I have bought some of that too, ahem did I hear someone say French Terry addiction?!).


Okay, on the the next version. I love it so so much. Mostly because I had this vision about this faux sherpa knit and it turned out exactly as I had hoped. I was literally squealing when I tried it on. I wanted the texture from the sherpa but obviously not look like a round sheep ready for it's next hair cut, haha.


I did make one more adjustment to the pattern and that is a more general one. It regards the sleeves. On me it looked like the sleeve was a bit too wide - as in I had some extra fabric on the sides of the of the sleeve. I looked though the post with tester versions and a few others had it too but not at all everyone. It might just me my body, ha who knows! 
SO I curved the sides of the sleeve head (both front and back) more and then I also raised the sleeve head so the sleeve still fit in the armscye (plus a little bit of ease).  
Problem solved!


Okay, this is probably the most boring 'from behind' photo ever, haha. SO I want to mention how much I love my CoverPro 2000 from Janome. We started out pretty good friends and now (after some practice) we are really really good friends. I just love how all rib seams are stitched down and it still looks great after washing too - which both these have been at the time I took the photos. I simply had to wear them right away and all the time.


The pattern (view B) includes the high-low hem which I absolutely love!

Okay, that's it folks. I absolutely plan to make some of the other versions too, but this one was to me the most fashionable and fun so no doubt I had to start with that, and then I will be back with some more Halifax Hoodie Goodies (sorry, that was a bad one!)

Get your own Halifax Hoodie HERE.

Thank you!

Wednesday, November 4, 2015

Knit Tunic with a Front Yoke.

So this is the first installment in the trilogy called spam-with-blog-posts-containing-photos-of-me.

Today I'm showing you an altered version of a knit swing tunic from the Japanese sewing book called Simple Chic.
Maybe it's easier if you jump over to the blog Japanese Sewing Books. She made a review and is showing photos of the original tunic HERE. The pattern is H-1 - Jersey Flared Tunic. It's kind of easier to talk about alterations when you have seen the original, right.

I'll be right here waiting...... 


Okay, so now that you are up to speed on the original tunic you can see that I
 didn't do any mayor alteration but I think I did some important ones. 

The first thing I did was adding the front yoke. I didn't have enough fabric to either make it grey or blue so to make the color blocking a bit more purposeful I added the yoke so that the color from the back piece continued on the front. I'm not sure if that makes any sense besides in my head but hey, that's where it matter, right!


The second alteration I did was making it more fitted in the upper body and then have it flare out just below the waist (instead of starting to flare out under the arms like the original). It's hard to see in these photos because I ended up putting a belt on but later down in this post I'm showing you another version without the belt.

Looking at myself I do prefer it with the belt but I think I can just about swing it without too and I have totally mostly worn it without a belt.


I made the smallest size based on my bust measurement (and the fact that my fabric is quite stretchy) but I was forgetting one important detail. While my bust might be small my shoulder width and arms are more medium sized. Oops.
The sleeve was suppose to be longer but I had to cut the lower part off because it was simply too tight. And you can see at the photo above how the sleeve is crawling up my arm whenever I was moving.
It's not so bad that I felt the need to cut new sleeves but I definitely fixed it for the next one...further down in this post!


The fabric is this amazing thin, stretchy and drapey Rayon Bamboo French Terry from Fabric.com. It's a bit pricey ($15/yard) but worth every penny and comes in great colors. I cannot not recommend it enough - and no I'm not an affiliate!


Here is my second version where I fixed the sleeves. Ah, much better.

The stripe is an amazing cotton interlock (leftovers from an earlier project) and the heathered black is another thin and drapey French Terry. This time from Girl Charlee.


A style like this is just perfect for leggings, jeggings (like I'm wearing) or skinny jeans if you don't quite feel showing off your thighs that day. I honestly feel like I'm wearing pajamas but I would mean I look like I dressed that day. And the boots are just for show, I would just stick my feet in my black leather Vans and be on my way.

I'm sorry but I don't have any more photos of the last version. The rest are either similar to the above or blurred and out of focus, so this will have to do but I think you get the idea, right!

Thank you!!