
I have felt a certain pressure to post about the Bob Woven Pants from Style Arc. Positive pressure that is. Lots of people are excited and interested in these pants but also a bit sceptical because of the curved legs.
I was definitely skeptical too and decided to use some fabric I wasn't that into. Another plus about this fabric was the drape. It's rayon and has tons of drape. I've learned along the way that whenever I'm unsure about a voluminous shape, rayon is a good place to start.
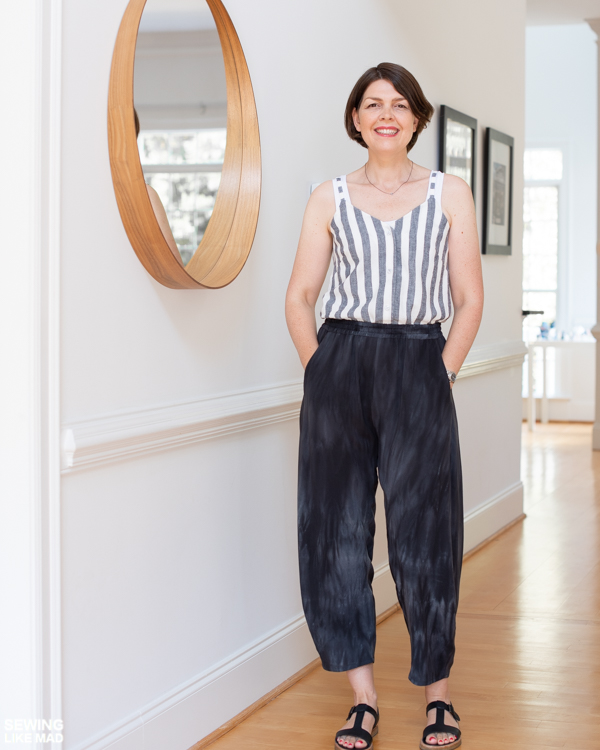
It turned out there was no need to worry. In fact I totally love them and have already made another pair. Even in this fabric I love them, although technically I don't like tie dye prints. It's sandwashed rayon and apparently that effect comes out like this on darker fabrics. I had bought it previously in dusty rose (see the Fringe Dress I made HERE) and grey (see the Parker Tunic I made HERE) and both were much more subtle than this black one. Oh well. They are a dream to wear, so at least there is that.

I made a size 12 with no changes whatsoever....besides the pockets of course. More about that further down. Oh, and I made my usual elastic waistband with casings as well, but that requires no pattern changes either. See THIS post for more info.
So with my height 178 cm / 5'10" I knew they would be short on me but since I live in a warm climate with summer lasting 5-6 months, I thought a cropped length would be great for me. Sometimes I need to add height to the rise when I make their pants but not this time. My hip measurement actually put me in size 14 but the finished measurement told me, there was plenty of room in a size 12. I really don't want to change a thing with these.
They remind me a bit about the Ethel designer Pants but with slightly less width around the hips and not so lowered crotch. Plus the Bob Woven pants have the curve at the bottom of the side seam, which gives a bit of an elasticized hem effect...without the use of elastic. But that detail is hard to see when they are sewn in slinky rayon.

I'm officially done putting inseam pockets in pants. They are so annoying to wear plus I think they add ever so slightly to the hip area and I don't need that. This is JUST my personal opinion. If you love them, by all means add them.

I wanted to show you how you can easily add a different type of pocket to any pair of pants. They work especially good in loose style pants like these. I asked on Instagram, what to call this type of pocket and Iiterally every reply gave me a different answer, ha. So I kind of decided to name them myself, with the help and inspiration from the people replying on Instagram (thank you for your time and suggestions!). Since they are drafted and sewn exactly like a Slanted Pocket...but with a curved opening, I decided to call them a Curved Pocket. You just call them whatever you want. 😂

Now before we even begin with this tutorial, I have to mention that I'm assuming you are sewing with thinner fabrics and therefor are making your pocket bags in the same fabric as your pants. If you don't do that, you need facings. And they are not included in this tutorial. So now you know!
The first thing you do, is to draw the pocket opening. Don't do any cutting yet, like I did. (Sorry, sometimes I decide to do a tutorial a bit too late in the process.) Yup, any shape you want as long as it's a smooth curve. Check that it fits your hand plus a bit extra. Don't forget to add seam allowance (SA from now on). As you can see, I have marked a 6 mm SA on my pocket opening curve. So the actual, finished pocket opening is the blue line on the photo above.

Now you need to 'draft' the pocket bags. Yeah, it's so simple, that using the word 'draft' almost feels excessive, ha. You can actually use the original inseam pocket bag....with a few changes of course.
What I love about 'my' type of pocket is, that it is sewn into the waistband, which means it's secured in place.
So you need to do two things.
1) Extend the pocket bag, so it reaches the top of the front pants pattern piece, and then trace the top of the pocket bag to match the top of the front pants pattern piece.
2) Because this pocket is placed higher up on the side seam than the original inseam pocket, you need to adjust the side seam of the pocket bag to match the side seam of the front pant pattern piece. You can see this done by the white arrow on the photo above. I shaved a bit off the bottom of the pocket bag, and then adjusted the SA. Blue line is new SA after adjustment.
Pocket bags isn't some complicated type of pattern piece. It just needs to (exactly) match your top/waist and side seam and be big enough for your hand.
The red crossed out notch further down on the side seam is the mark of the bottom placement of the original inseam pocket opening. You can ignore that notch now. There is another notch marking the top of the original inseam pocket opening too (hidden by my pocket bag in this photo) and that you can ignore too.

NOW you can cut off that extra piece. Save it in case you one day want to make these pants without pockets or with the original inseam pockets.
Next step is to trace/copy the pocket bag we made in the previous photo, but this time have it follow the pocket opening curve, SA included. Don't forget to transfer the grainline indicator/line too. It's the same as the pants.
Now you are done. You have prepared the front pants pattern piece, and drafted an inner and outer pocket bag. You need two of each, one for each pocket on each side.

And here is the finished result. If I were really organized, I would have shown you how to sew it too. Unfortunately I'm not. 😂 But it's sewn like any slanted pocket. Don't forget a strip of interfacing on the pocket opening. I put it on the pocket bag piece, that is sewn to the pocket opening curve on the pants.

And don't forget to understitch that curved seam/pocket opening, after clipping the SA on the inside.

Here is an inside look. This photo is taken after I've worn and washed them, so it has definitely lost that 'fresh off the machine' look, that they have in the other photos. A dose of reality for you here, ha. Also, you obviously don't have to sew your pocket bags with French seams but it does look lovely. I would only recommend you doing it when sewing with thin fabrics anyway.

Happy camper with her pants with pockets.

A look from the back. As per usual StyleArc draft it just right.

I can't wait to you show you my double gauze Bob Woven Pants. They are fabulous too.

Get your own pair of Bob Woven Pants HERE.

Don't forget I link to the pdf single size version (you chose one size and you automatically get the size bigger and smaller in 3 separate files) because that's my favorite format, but there are several others, so do your research before you buy.
Also DON'T FORGET:

...on their own website only.
Do you sew your pocket front and backpieces together first or attach the front the to the pant's front and the back to the pant's back before sewing the pocket together. It seems like my pieces don't line up well when I do it the second way and I could use some hints.
ReplyDeleteThank you!
I definitely sew the pocket opening seam first (so pocket bag to pants), then I clip the curve , understitch and then I press that seam. And then I'm ready to place the back pocket bag 'behind' the opening to form a pocket. The two pocket bags are (or should be) exactly the same, except one has the curve/pocket opening cut out, so they have to line up. I don't think I have any other hints that this. I hope this makes sense. :-)
DeleteI love these pants! The shape is perfect - and your pocket modification is a great touch.
ReplyDeleteThank you so much!
DeleteThank you!
ReplyDeleteInstructions ROCK....loved the directions for the Curved Pocket bag-Thanks!
ReplyDeleteLaura
Good
DeleteInstructions ROCK for the curved pocket.....amny thanks!
ReplyDeleteHello. Do you happen to know what height Style Arc patterns are drafted for? I've looked everywhere and couldn't find anything. I'm only 5'3 so I'm sure I'll need to shorten items. LOL. Thank you!
ReplyDeleteI don't know specifically about Style Arc, but I have found that a certain number of inches is pretty consistent with ready-to-wear, and just happens to be about how much I end up shortening for patterns. I think perhaps they are all using most of the same standards for sizing.
DeleteI have a Style Arc pant pattern, there is a marking around the calf area, if I remember correctly, to lengthen or shorten.
ReplyDeleteI’m a few years late to this party, but thank you for this post! It emboldened me to make some big changes to the original Bob: I just made my first Bob pant using your pocket hack (I made an actual slant pocket in place of a curved pocket) and also lengthened them (following Coco’s Loft, who referenced you!) I also made a more pronounced balloon leg (imitating Nadinoo’s balloon trouser), and somehow it all worked out on a first go. Too much fun, as this many alterations NEVER works out for me! Thank you for your blog!
ReplyDelete