
Today I am fixing a mistake I made with a tutorial I posted last summer. Okay, using the word mistake might be a bit dramatic. The problem was that the post was a HUGE and very photo heavy tutorial for sewing my wave skirt from start to finish (see that post HERE). Some might ask what in the world the problem with doing that could be....well, I actually showed one of my favorite invisible zipper tricks (or rather finishing it up with lining etc) in it and I think it sort of drowned in all the other information.
SO I have done a few improvements to it and is now just showing you the tutorial to one of my favorite sewing tricks.
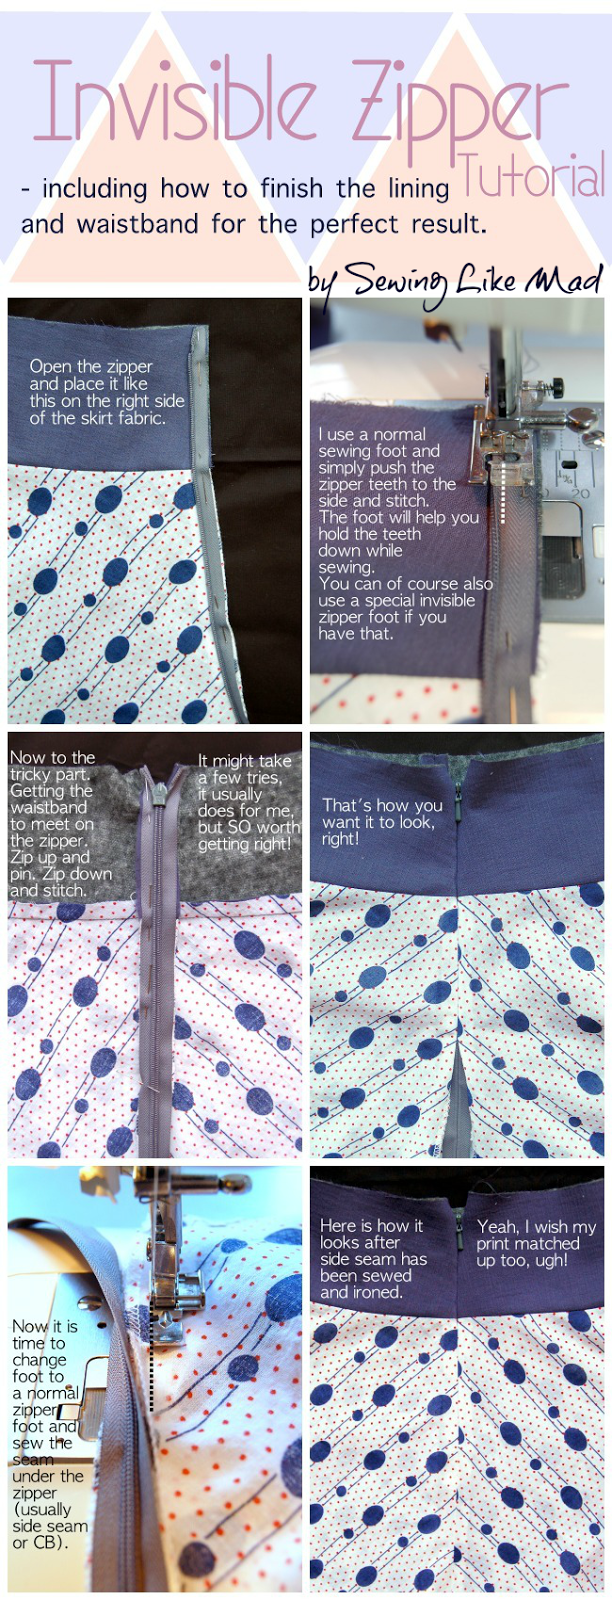
The tutorial is starting with the photos for sewing an invisible zipper (without a special foot) in case you were interested in that too and the second collage is THE TRICK to a perfect finish.

* I needed a bit more space to explain this step.
SO this is a trick to sew your lining/inner waistband/facing to an invisible zipper. It is actually super simple but the result is gorgeous!
You are probably used to placing the inner waistband - right against right side - and sewing down along zipper. Well, you are still going to do that BUT first you are going to shift out your inner waistband so it sticks out 1 cm (3/8 inches) at the very top and 0.5 cm at the bottom of the waistband (see photo). The rest of the way (the lining) you just do as usual and no shifting. And NOW you sew down along the zipper. See graphic stitches on photo.
You will need to look at the last photo in the tutorial before you see the point with the shifting....but I promise you that you won't be disappointed!
Pretty cool, huh!
You will never go back after you tried this!
Thank you.
Great post! I love how nicely those top edges come together. I will definitely use this. I've been hand sewing the final steps to get everything to work nicely, but this is a great (faster) method!
ReplyDeleteI just found your blog because of your Juki sewing machine. You are really talented, and I hope I can try this method one day. Did you sew this on your industrial machine? Thanks
ReplyDeleteHi, great tut! I can't tell from the photo, by "shift out" , do you mean to not line up the seam allowances but to pull out the fashion fabric the measurements you gave? So that the fabric fabric is not lined up with the lining?
ReplyDelete