Monday, August 26, 2013

Sew Many Books - The Fashion Version.

Okay, this title requires a bit of explanation!
Today I am over at Nap-Time Creations as part of her Sew Many Books-series. 
Nope, I am not going to tell you which book I have chosen....You have to go look for yourself of course, hehe! And if you actually are coming from the book-post: Welcome!


But what I will tell you is that I struggled with this challenge. Make an item of clothing after a children's book. Why did I struggle? Well, I am not much of a costume person (that is just me - nothing wrong with people that like sewing costumes, okay!!). I like to sew things that are being worn a lot - that is probably why I don't enjoy sewing big party dresses either. I am en everyday clothes kind of person. Soooo what to do? Make the book's character's clothes into something more wearable of course. 
The character is wearing a yellow shirt with 4 big different colored buttons - yeah, that would probably not be worn again, ha!
I found this shirt in the Japanese pattern book Girls Clothing by Akiko Mano and that fit the bill with button placket, collar and collar stand.
I did some changes to the pattern but will not repeat them here since I am telling about them in the post at Nap-Time Crafters.

The fabric is a neon lime green cotton corduroy (Kaufman 21 Wale) and the dot is THE neon dot from Michael Miller that I already have used on SO many project so far and absolutely love. I bought mine at Michael Levine remember?!


After the photo shoot for the book part of this post I removed the big colored buttons that I had just sewed on slightly and with no button holes.
And changed them into these beauties - oh the stripy buttons - from Lots of Buttons.
I absolutely love them.


The pattern has pockets and since Wilma suddenly requests pockets in everything I knew I had to keep them. And I used the dot fabric to create a contrast with them.


I also made some matching leggings. I really did try not to make the outfit too matchy matchy but arghhh it is definitely my weakness. I mean I had this lime knit that just matched the corduroy from the top peeeeerfectly. AH, I could not help it!
You can read all about these leggings and see a lot of other versions in THIS post.


And last but not least I also had the pleasure of a model with attitude. Jeez, those 5 year old ladies.
Don't worry no Mommy/photographer got hurt in this session - it is just a leaf from the tree she is throwing at me - I guess we are done then! Tsk tsk tsk.

Thank you for coming by.

Follow on Bloglovin


Tuesday, August 20, 2013

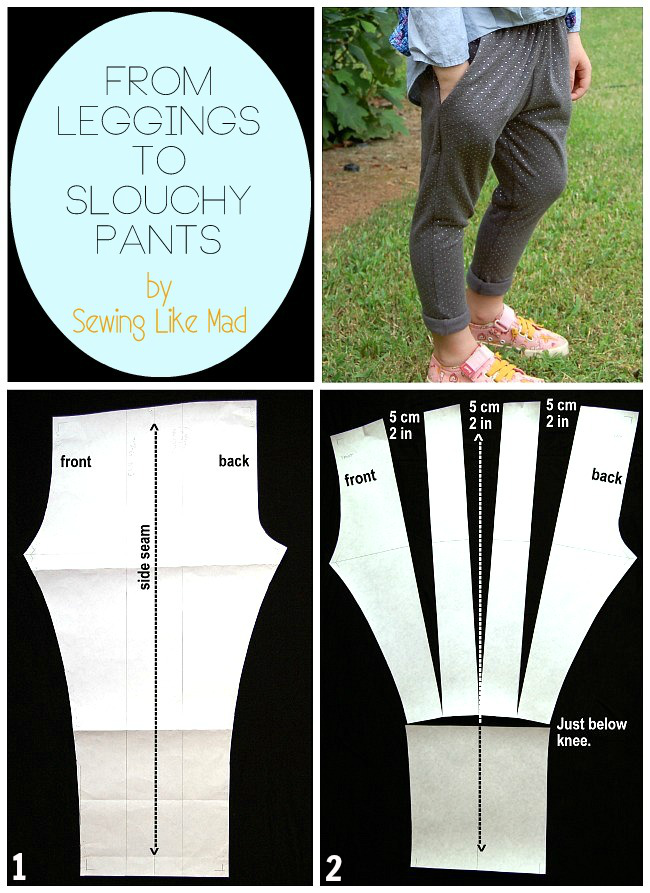
From leggings to slouchy pants. Easy pattern alteration tutorial.

This month we decided to divide my Sewing Rabbit Creative Team post up in two parts.
On Me Sew Crazy you can get some tips to rethread your serger and unpick your serger stitch the absolute easiest way. If you do not already know these simple tricks they are going to blow your mind (I hope, haha).

And here I am showing you how to with a few steps can transfer your leggings pattern into a pair of stylish but still super comfortable knit slouchy pants. 


Before we start the tutorial I just want to add that it is a 'real time' tutorial so I actually ended up with two fittings and extra adjustments before I was satisfied and you are getting it all in the photos below.


1: Start with a basic legging pattern. This one self drafted. But there are several great tutorials for self drafting leggings out there in blog land. THIS one from 'One Little Minute' is very detailed. And THIS one from 'Make It and Love It' is the fast one where you trace another pair of leggings. And if you are not the self drafting type then 'Go to Patterns' have their bestseller Go To Leggings pdf sewing pattern for sale at their web shop HERE. In other words lots of options!

2: The first thing you do is copy your leggings pattern because you have to start cutting into it to add the width. Because I only wanted the width in the thighs I first cut of the pattern around the knee. Then I made some vertical cuts in the top part all the way down to the knee line so that the paper only just stays together with like a thread. And then I spread out the pattern as seen above on photo 2.


3: Then you trace the new shape to a new piece of paper. Don't worry about the curve that happens to the knee line when you spread out the top part. Just reattach the lower knee piece to the spread out top part like photo 2 shows - so the sides are touching. To lower the crotch seam we have to make the crotch seam longer, right! So I am adding 3 cm ( 1 3/16 in ) to the top of the pattern as seen on photo 3. That is much easier than lowering the bottom front and back seam and the result is in my opinion the same.

4: Now I thought I was done and sewed up a sort of a wearable muslin - if they were good that is! 
Hmmmm, I was not completely satisfied but I knew I was going in the right direction. The width in the upper thighs was right but they were too tight around the knees. I only wanted them to be tight under the knees. 
As a side story this first version ended on my three year old. Since she has shorter legs the thigh width fitted her perfectly (get it? The distance from top to knees are shorter, right!). They are of course too long in the full length but with a few roll ups (or an alteration if Mommy would ever get around to that (don't think so)) and they are good to go!   

Okay, carry on now Mie......


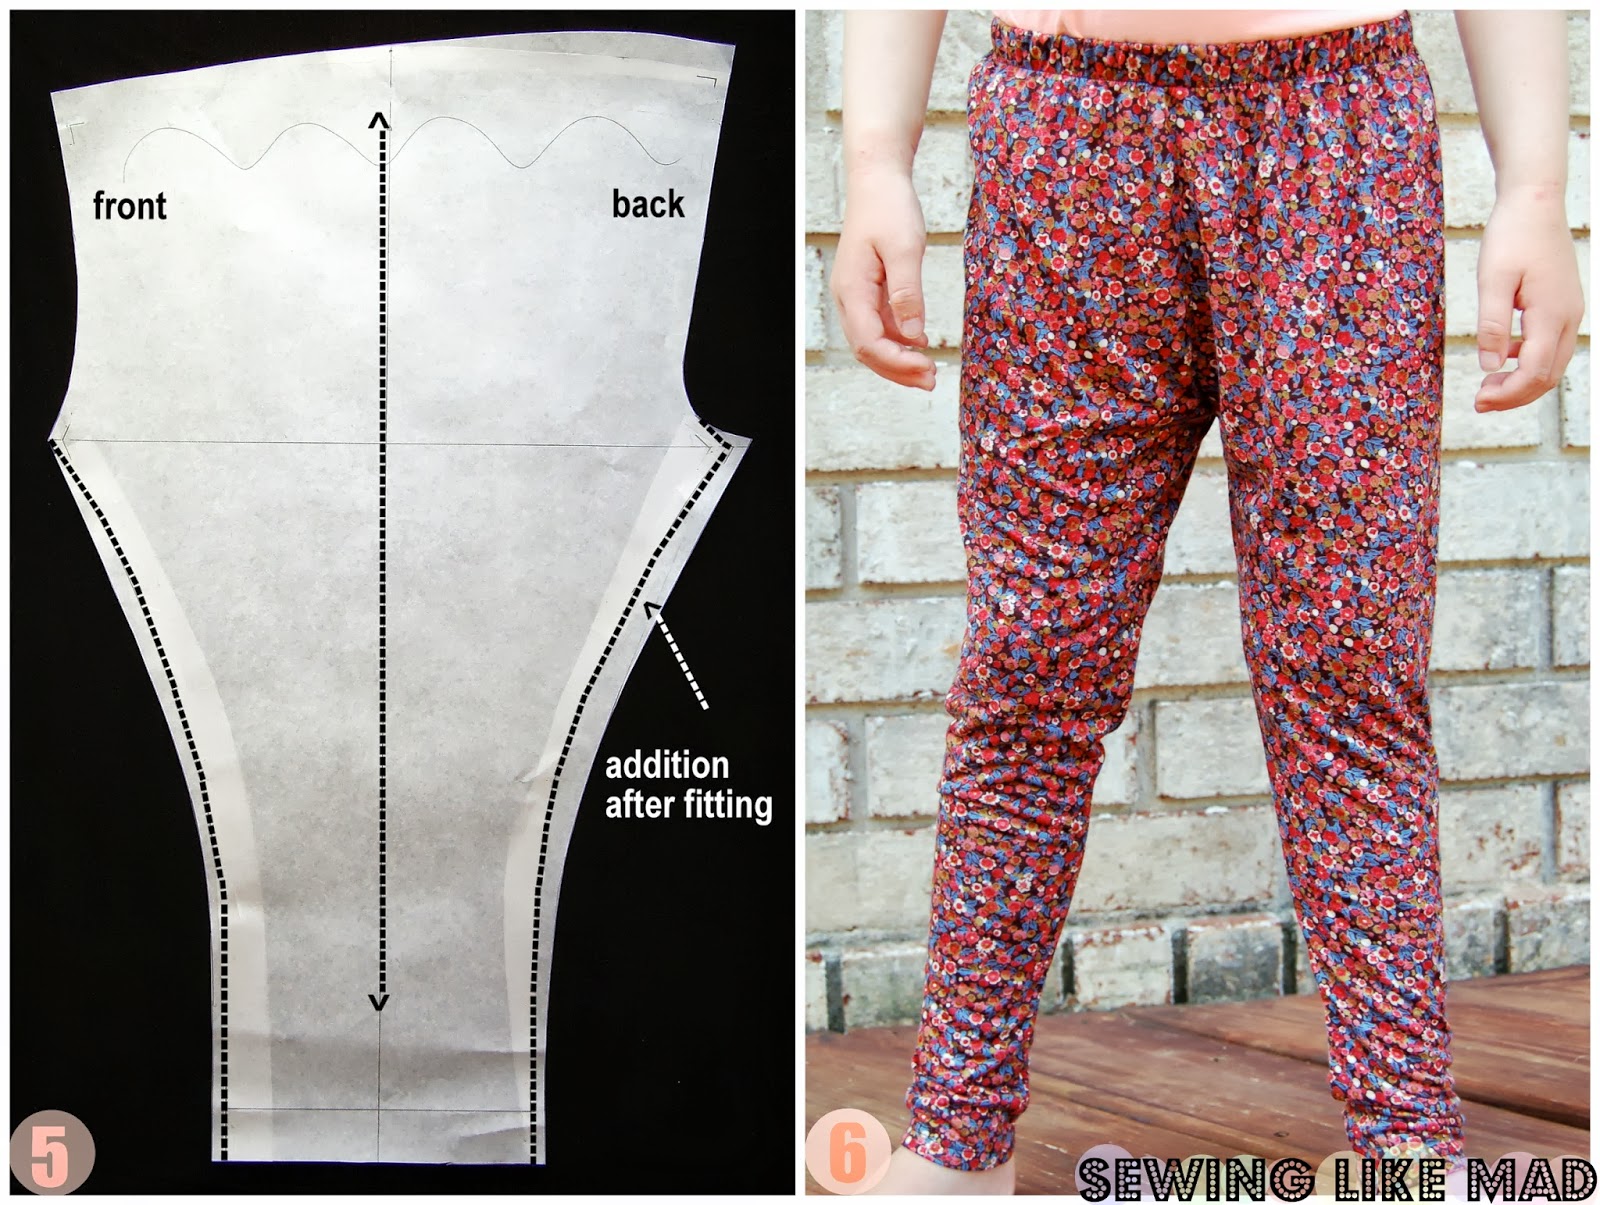
5: Here you see what I added to the pattern after the first fitting. I also thought they needed a bit of extra length only in the back crotch seam (sorry, I have no photo of that so you just have to take my word for it.) but since I was already adding to the thigh width I also added a bit to the back crotch seam. In the front I only added to the thigh, knee and a tiny bit to the lower leg.

6: Time for second wearable muslin and this time I was satisfied.


7: I wanted to add pockets to make them more pants alike. So I simply traced my pattern again. This time making a front and back pant pattern piece by simply splitting the pattern at the seam side - just remember to add seam allowance. If you need help to draft a side pocket pattern I have made a tutorial for you right HERE

8: DONE! These are made in this really soft grey cotton jersey with tiny silver dots from Girl Charlee - seriously where else, right!


That is all for me today. Thank you!

Follow on Bloglovin

Monday, August 19, 2013

Sewing for Kindergarten - Amazing giveaway! Updated with winner (26th of Aug. 2013)

To kickstart my first ever series Sewing for Kindergarten (read all about it HERE) I thought an amazing giveaway would be in place - and luckily my amazing sponsors agreed!

ONE lucky winner takes it ALL.

See the prizes and sponsors below.


If you have already read about the series in the other post you have probably noticed that yes this prize packet is the same as the 3 winners in the 3 sew along groups will receive. Very generous sponsors this series have, thank you!!

Now go fill out the Rafflecopter below. Some entries are easy other requires a bit more work (and will therefor give more entries). It is of course up to you how many entries you will go for.

The winner will be announced here on the blog and Sewing Like Mad's Facebook page monday the 25th of August so make sure you follow along!
GOOD LUCK!


The Rafflecopter came up with the following winner:

Maggie Weik
Congratulations!!

All the lovely sponsors will get your email address and contact you directly with instructions on how you get your prizes.

This competition is open to international participants but please know that free shipping is NOT included (for either US or international addresses except Gold Star Tool that always has free shipping to US addresses. Lots of Buttons has free shipping if you buy for over $20 and Girl Charlee if you buy for over $99 - but again US addresses ONLY). So whatever you buy for your three gift cards you will have to pay shipping for wherever you live. You can of course use your amount of the gift card for shipping but will get less goodies then.

Tuesday, August 13, 2013

Side Pocket Pattern Drafting and Sewing Tutorial.

I guess we can call today's post a bit of a recycled but also upgraded post. This tutorial was first brought back in November last year as part of Elegance & Elephants' Knock it Off-series but has never been brought home here to Sewing Like Mad.

The photos have been reedited and the text corrected where needed.
This is a tutorial on how to add a side pocket to any pants pattern plus how to sew the pocket bag with French seams.


1: Start on your front pants pattern and draw the line for the pocket opening. There are no rules - it is more a matter of design and what look you want to give the pants - but remember you have to make the opening big enough for a hand to enter.

2: Add seam allowance to the pocket opening.


3: Now it is time to draw the line for the pocket bag incl. seam allowance. Again there are no rules but there has to be room for a hand in there.

4: Now you can very precisely trace two pocket bags. The only difference in the two pattern pieces are (as you can see in photo 4) the left top corner. The back pocket bag follows the outer line of the pants and will be visible when the pants are done (which mean you can either play with contrasting fabric or use the same fabric as the rest of the pants are made of)  and the front pocket back follows the pocket opening.


5: Now you can cut away the top left part of the front pant pattern because you will have the back pocket bag to cover that bit. It is important to note here that I will cut the pocket bags in the same fabric as the pants them self which is obviously the easiest but not always possible. You can do it if the fabric is thin like here but in thicker fabrics like denim, wool or corduroy you will have to do a little extra pattern drafting and sewing but soooorry I won't show that in this tutorial.

6: If you are a bit confused like me and cut the pants first and then realized I wanted pockets you can use the little top left piece you cut of (see photo 5) to cut that bit of your already cut pants - ahem, great planning here! 
It is always a good idea to put a line of interlining along the pocket opening (on the wrong side of the fabric of course) to avoid the pocket opening to go wavy after sewing.


7: Sew the front pocket bag to the pants in the pocket opening right side against right side of the fabric.

8: To sew the front and back pocket bags together with a french seam you have to first sew them reverse against reverse side of the fabric.


9: Then you turn the pocket inside out and seal the overlock seam (see photo 8) with a stitch and after you have ironed it you will have a very nice looking pocket bag.

10: Here you see the pocket from the front. Easy? yeeeees!


And here you see the finished pair of slouchy pants perfect for play, fall and back to school attire.

Sunday, August 4, 2013

Darling Daisy Dress Pattern Giveaway.

Today we have a cocktail of a happy girl, an obnoxious chihuahua print AND two chances to win Sew Like My Mom's first digital pattern Darling Daisy Dress. Hooray!


This pattern comes with 17 size options from 3 months to 16 years - wow!
I chose to make the knee length version with a bodice plus two tiers but the pattern also comes with pattern info for a third tier which makes it into a maxi dress.
This dress is a super easy and fast project - something we all need from time to time, right!


I am considering putting this sequin hat on her for every photo shoot because it was one happy girl I got in front of the camera. Giving me dance moves and 'model' poses.


Making this cute dress in this hilarious print might have something to do with it too. I mean look at that chihuahua! It certainly makes me laugh. You can buy the fabric HERE.


When I first saw the pattern I was sure I was going to make my (usual) color block on every tier in the dress BUT then I bought the chihuahua fabric (not having specific plans for it and when it came I noticed the dog's red with white dots butterfly and I realized that I had fabric that matched that exactly. SCORE!

I love that elastic neckline by the way.

SO Melisa from Sew Like My Mom have not only been so kind to give me a free pattern (thank you SO very much) she has also agreed to give TWO of you lucky readers a chance to win it. 

How? Simply just leave a comment below including your email address so I can contact you if you are one of the two lucky winners.
For an extra entry share this giveaway on your Facebook page and leave another comment saying you did so (also including email address).
Max two entries pr. person.
This contest is also open to international participants, yay.
The giveaway will close sunday the 11th of Aug. 2013 at midnight EST and the winners will be announced here on the blog and on Sewing Like Mad's Facebook page monday the 12th of Aug. 2013.

Good luck!

UPDATE AUG 11TH 2013

The lucky winners of one digital Darling Daisy Dress pattern each are:

Amy Mayen (comment no. 5)
&
Pam (Threading My Way) (comment no. 15)

Congrats ladies!

I will give your emails to Melissa and she will email you the pattern directly.

Thank you everyone for your nice comments!


Tuesday, July 23, 2013

Sewing Rabbit Creative Team - July 2013 edition.

My July edition for the Sewing Rabbit Creative Team is live on Me Sew Crazy.
Today I am talking about bias tape and I am giving you two tutorials. The first one is how to sew with bias tape you make yourself without any time consuming pre-ironing. The other one is how to use your home made bias tape to hem with and again with minimum ironing. And then I am showing you how to make that shirring and gross grain combination 'belt'.


My girls crashed the photo shoot and I like this one. 

Now the full post is just a click away HERE.

Monday, July 22, 2013

Sew a Wave Skirt - Full Sewing Tutorial

Today I am bringing home my first post as a contributor on Me Sew Crazy.

Welcome to my first Sewing Rabbit Creative Team tutorial and if you are the visual type I am pretty sure your are going to be satisfied after this post. It took me 27 photos to explain how to sew this skirt and I hope you will 'see' everything you need...and there is some text too for those types, haha!

So what are we making? This skirt!
You might remember the skirt from THIS pattern drafting tutorial? In the end of the post I promised a sewing tutorial....and here we go:
You need to use some fabric with a great drape. I have used cotton voile and was therefor forced to put a lining in too. But poplin would work great too and if it is not see through there is really no need for the lining. Up to you!
Since you are the one drawing the waves/curves on the skirt pattern, you can totally avoid this 'tricky' part by not having the middle part of the skirt go all the way down and become part of the hem. But I personally really like that detail. Juuuust saying.
*I made the first skirt (from the pattern drafting tutorial) with French seams on the curvy seams (because you know - or will find out - that I am annoying like that) but it kind of back fired. Like any other curvy seam they either needed small cuts (which I would only do on a totally hidden seam) or a more narrow seam allowance to make a smooth surface on the skirt. So I ended up having to stitch the seams on the first skirt which works okay but I would prefer it without. So this time I choose a way more simple solution. Sew and cut 2-3 mm of when overlocking. Worked like a charm!  

*Okay, this photo gets it's own space because you need to see this on a big photo. I have learned it from my friend Rikke who has learned it from her friend Line (we all have the same education from Denmark and you can imagine some geeky sewing conversation we can have!)
SO this is a trick to sew your lining/inner waistband/facing to an invisible zipper. It is actually super simple. You are probably used to placing the inner waistband - right against right side - and sewing down along zipper. Well you are still going to BUT first you are going to shift out your inner waistband so it sticks out 1 cm at the very top and 0.5 cm at the bottom of the waistband (see photo above). The rest of the way (the lining) you just do as usual and no shifting. And NOW you sew down along the zipper. See graphic stitches on photo above.
You will need to come a little bit further down in the tutorial before you see the point with the shifting....but I promise you that you won't be disappointed - ohhh, the pressure! 
And here you have it folks.....the result of the shifting.....look at the right photo above. It always makes me smile when I have used this technique because it just looks so clean and finished.
Well, so I guess the 'prize' you get for making it all the way down here is the reveal of what my next Sewing Rabbit Creative Team post is going to be about. Great! 

And you are in luck. The bias tape post is on Me Sew Crazy tomorrow July 23rd. I would love for you to come back and check it out.