Hello friends, it's time for another blog post which means I have a bit more than normal to say about this pattern. You can call it an extended review.
I have talked before about being cautious to try out new to me pattern designers. I have quite firm ideas about how I like patterns to be drafted (aka correctly, lol) and it greatly ruins my sewing experience when I get my hands on a not up to par sewing pattern. Especially because of my promise to always be honest about the experience. I HAVE to talk about it because my integrity as an honest sewing blogger is something I value greatly. Honestly, what is the point of a review if it only mentions the good things?!
Now I don't only write honest reviews if there's something wrong with the drafting. It can be smaller things too, and much more personal opinion based. And this post is one of those examples.

I had high expectations to this pattern and it didn't quite live up to it. To me personally it's not always enough that the end result is good. And with the Vali Dress it is good, there's no denying that! But I also want to have a good sewing process.
My hesitancy to try new designers, makes me lurk on their work for a long time when I find someone that offers interesting designs and who sews (or shows) quality samples.
That was also the case with Pattern Fantastique and the Vali Dress.
I especially noticed how pretty much everyone that makes the Vali Dress gets a result that looks good, which definitely can be a good sign. Check out #validress on Instagram for a ton of pretty dresses and tops.
I also noticed how many said the yoke took forever and was a bit (or very) complicated. BUT because everyone ended up with such good results, it made me more interested because I interpreted that as the instructions were given to the higher quality levels (remember I talked about that in THIS post). And that's where my expectations couldn't live up to the actual instructions. I will of course elaborate.
But my first disappointment was when I was about to print the pattern. No layers, ugh. I even emailed the designer to check if I missed something. But no, I had no choice but to print all the 11 sizes. I don't like to waste precious and expensive ink like that. It just seems like such a standard thing these days, that it stands out when it's not available. It's not a dealbreaker for me, but I find it annoying.
Okay, back to the instructions and finishes. My main concern and surprise is regarding the yoke. To me it's very unusual to not have that simply cut in a double layer and all seams hidden inside. OR a double layered yoke with the seams covered by bias tape (or overlock if that's more your jam). To have a yoke where the neckline is finished with a facing is very unusual to me. And on top of that the facing provided also caused me some questions.
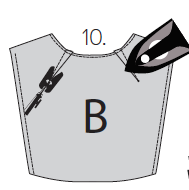
So as you can see on the screenshot above from the pattern instructions, the neckline facing has four pattern pieces. The area that made me pause was the front facing. I totally understand why pattern piece J is separate. It's because you have the option to extend, or not, the slit down in the bodice. Best case scenario would have been to offer two different facings depending on which version you want to make, because you really want as few seams in a facing as possible, but I can accept this version too.
But to the best of my knowledge I don't understand why E and F isn't combined. The red markings are mine. Now like I have already said, I wouldn't have chosen a facing here at all, BUT if I had to draft a facing, I would have skipped the seam that I crossed out. It will only cause extra bulk plus that seam is visible when the weight of the ties open up that front slit. Then I would make a smoother curved outer edge, which makes it easier to hem. I'm sorry for my helpless red line trying to show that 'smooth' curve, ha. I drew it with my finger on my phone screen. But I hope you get the gist.
Also, the darts in the back neckline in the yoke gave me pause. I don't think I have ever seen that before in a yoke. As far as I know, the reason for yokes, besides the design element of course, is literally so we can work darts (shape) into the lines of the yoke. It seems like a missed opportunity for a cleaner look but I might be wrong here.
The inseam pockets are suggested to be sewn in a way I have never seen before. Now I decided to skip pockets all together, I often do that in lose, lightweight dresses because I don't desperately need them and I hate how they always need ironing after wash or they function as filler hips on me in their crumbled up state. This is just a personal choice/opinion.
So I didn't try this new to me method of sewing an inseam pocket and can't give my opinion on it. But personally I'm not a fan of patterns where the pocket bag is all-in-one with the dress/side seam. I think it gives a better structure to the side seam if there is that seam, which you get when you sew on a separate pocket bag. But again that's a totally personal opinion. It's not 'wrong' to do it that way.
The way this one is sewn though is intriguing to me. It isn't the classic way of doing it but it could be a great, new to me, way.

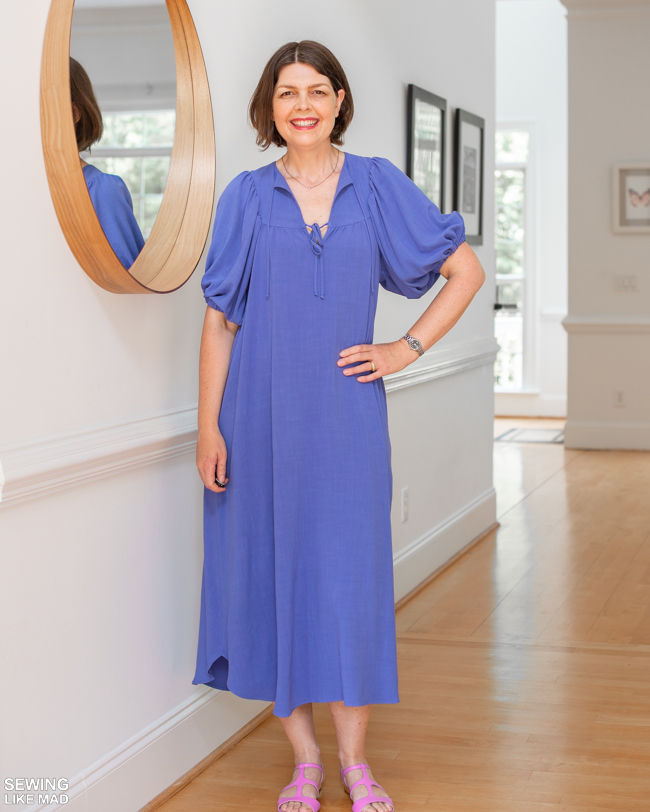
So how did I sew my dress. Like I already mentioned I feel like I improved some things but I didn't quite change as much as I really wanted to because my fabric is tricky and because it was my first time sewing this style.
My fabric is this lovely Mini Noil from Telio in the color periwinkle. I've sewn quite a few things with the big sister Silky Noil which is a washed viscose linen slub. The difference on the two is the weight. Silky Noil (70% viscose / 30% linen) is considered medium weight (6.87 oz/yd²) and Mini Noil (92% viscose / 8% linen) is considered lightweight (3.6 oz/yd²).
Both of them are truly lovely fabrics that feels and drapes like a dream. But they are tricky to sew with because they have a 'give' to them because they don't have a tight weave. They are not stretchy per se, but they are not hard woven like a cotton voile, lawn or poplin either. Also, the linen fibers makes this fabric more 'bulky' (e.g. in seams) than a regular viscose/rayon fabric. Mine 'insides' are never as nice as I want them to be when I sew with this fabric. So great timing to decide to show you my 'insides' for this dress, duh.
So I decided to go half and half on the yoke. I made my front yoke pieces fully lined and then I changed the back inner yoke to cover the whole shoulder seam and go down about half of the back armscye.
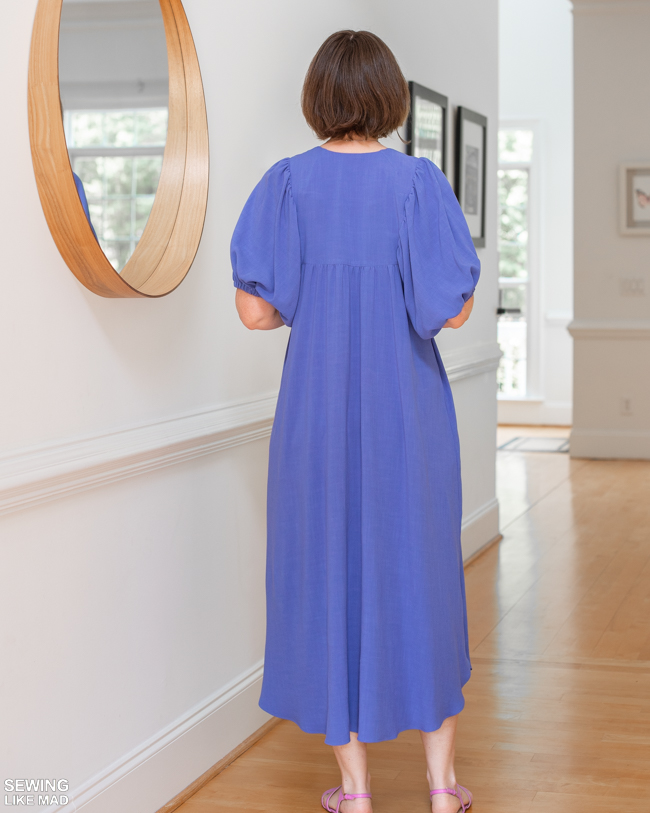
So here's the half back yoke which you can see has been extended to be part of the sleeve seam now.
And here's the front which now has no visible seams except my understitching.
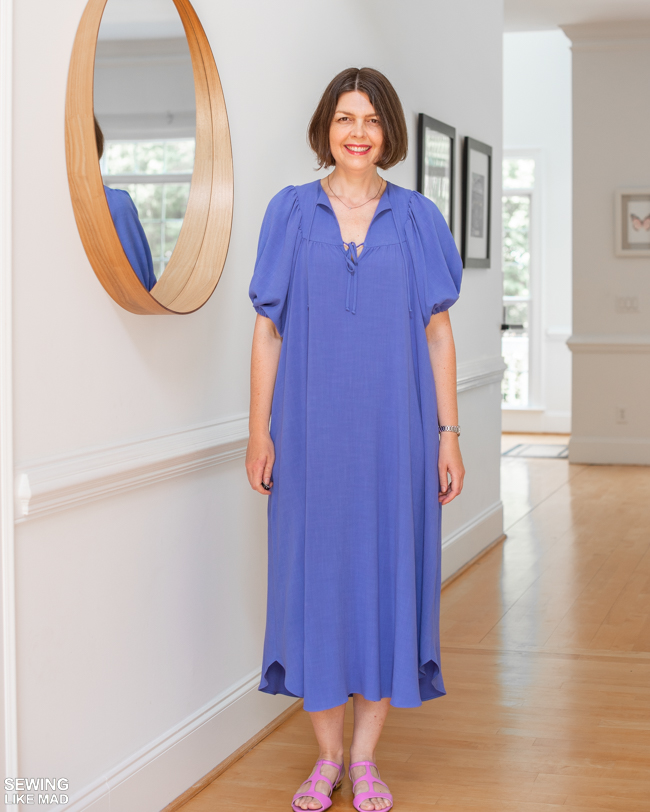
I wanted the extra deep front slit version but I skipped using pattern piece J and instead made a Continuous Lap Placket instead. It's basically a bias covered slit. I have a PART ONE and PART TWO tutorial for this on my Instagram page. It's a great trick to have in your sewing technique arsenal if you don't know it already!
I sewed my sleeves in in the round. So I sewed the side seam of the sleeves and the side seams of the dress separately and then I sewed in the sleeves.
Then I closed up that seam plus the two layers of the yoke with a self-made bias tape which I probably should have made in a thinner fabric now that I think about it. I cringe a bit looking at my bias tape work up there, ha. I think I was a bit too eager to see if it was all working out the way I hoped/expected.
I used the handkerchief method for hemming the dress, so I could do it after the side seams were sewn again going against the suggested instructions. HERE is a tutorial for that technique. The post is showing how to hem a facing, but you can use it to hem anything that is made in lightweight fabric. It's especially helpful for curved seams but can of course be used for straight seams as well. Like in handkerchiefs which I know we all sew so often, ha. No changes to the technique whether you hem a dress/skirt, a facing or a handkerchief.
Anyone else giggling at the gospel robe vibe light this color gives to this dress?
Yes yes, I still totally love it.
Can we also giggle at my timeline here. I think I sewed the dress in the very beginning of the year (2022), took the photos in May (that I know, they are timestamped in my editing program, ha) and here I am in September typing away at the review blog post which has been an open tab on my computer since July. Jeez!
Now I'm left behind pondering if I dare to also purchase the
Phen Shirt from the same designer. I mean I'm utterly obsessed with the design of it, even though I actually don't wear shirts that often, ha. But I do love sewing them. Maybe if I adjust my expectations accordingly. We will see...


Your dress is very pretty. I agree with your front facing modification. It can be bewildering to come across "odd" sewing techniques. I encountered one in sewing up an Issey Miyake pattern; it made no sense to my mind. Re a pocket cut as part of the front of a garment: a strip of thin fabric could be hand sewn along the fold line to stabilize the fold.
ReplyDeleteYeah, there's a fine line between 'there is many ways to do things' and 'ways that makes no sense', haha. Thank you for your nice words!
DeleteThanks for the review - I was similarly really tempted by this pattern but honestly can't stand to part with £12 for a PDF that I then have to make revisions to in order to use and construct in a sensible way, so I'll be skipping it. The new McCall 8312 has a similar yoke/sleeve detail so I'll probably just get that instead. Yours turned out pretty anyway, love the blue with your colouring and the pink sandals!
ReplyDeleteI agree, a pattern with that price tag should be well worked through. Thank you for the nice words.
DeleteWhat a and lovely Vali Dress. I super love the choice of fabric and the color is so beautiful. You look stunningly gorgeous and sophisticated in that dress. And it suits you perfectly. Love it<3
ReplyDeleteThank you so much!
DeleteBeautiful dress, and great review - thank you for your honesty! I have the pattern printed by patternsy on AO and quite honestly haven't looked at the instructions yet but was thinking of making it now. Those facing pieces are insane. I hate facings with a passion - however precise and careful I am, and however much I grade and understitch, I am never satisfied with my facings. I much prefer bias and work well with it. But this should never have been a facing. At least the front yoke should have been lined. And the shoulder darts (which I like) shouldn't have been nevessary. But I suppose it's to be expected. I have looked at the instructions for the pants pattern I bought from her and there are typos in it. Same as there are typos on the pattern pages... Her designs are brilliant and so is her drafting but some things are sloppy.
ReplyDeleteI don't have a problem with facings per se, but they have to be used where they make sense. I know we agree on this! :-) Thank you Francesca for your many recent blog comments. I appreciate them!
DeleteGorgeous dress!
ReplyDelete