
When I realized that I had more photos for this tutorial, than the allowed 10 photos for one IG post, I did a survey in my Stories on IG, asking if you preferred the tutorial split up in two posts on IG (part 1&2) or here on the blog. Guess which won...haha.
If you want to read my other info about this make, size, fabric etc, you'll have to go read THIS post on Instagram.

1) I wanted to take a photo of the pattern pieces next to each other but because of the way they were printed (half and cut to fold), I wasn't able to place them side by side and both having their front side up. So I had to take a photo of each side separately, 'flip' one of the photos and then put it together in a side by side collage for that to be possible. That's why the text on the shorter front split is mirrored.
But here you can see what to sew before you have even cut your fabric. The red dotted line is the side seam and you line up the notches A and you stop sewing plus back tack when you get there.
Then you also need to sew the 1 cm hem seam allowance together. Blue dotted line, B.
The back hem (left pattern piece, photo 1) is longer than the front hem (right pattern piece, photo 1), which will make things looks very wrong for a bit. But don't worry, it will turn out right.
2) Here you can see it after it has been sewn in the fabric. I finish my seams down to notch A. You would want to finish the edges separately, so you can split open the seams. The rest will be hidden inside and is not necessary.
3) Just a closer look at that 1 cm sewn hem seam allowance.
My bottom fabric edge isn't finished here because I have a coverstitch machine. More about that, plus if you don't, in point 14).
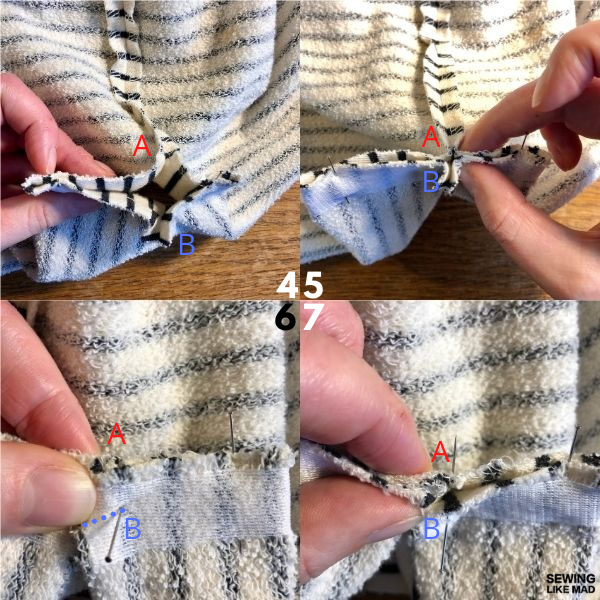
4) Now it's time to prepare to sew the actual splits. You fold the back split in half. You are going to have the A and the B point to meet. And afterwards you do the same with the front split. That's why it doesn't matter if they are the same length. They are not going to be sewn together at any point. They are being closed up only within themselves.
5) This photo is almost the same as photo 4 but here my fingers are pinching the two A&B points together for the shorter front split. The A&B point for the longer back split has already been secured with a pin. See photo 6 and 7 for close ups of that step.
6) We need A and B to meet EXCATLY. I'm sorry, there is not really any other way around it. So I use one pin, through one layer first, starting right next to where I stopped sewing that little hem seam allowance (blue dotted line, point B) and then through the next layer, making sure my pin comes out right next to where I stopped sewing the side seam (red dotted line, point A).
7) This is showing the same thing but with the seam tilted to the side, so you can see how the layers are placed on top of each other and the two A&B points are meeting up.

8) Now it's time to sew the first split. I find them easiest to do one at a time. So I pin and sew one split. And then I pin and sew the other split afterwards.
I leave my pin in to keep A&B together until the very last stitch. I don't have a photo showing this, but I sew until I'm 2-3 stitches away from the pin, stop and hand wheel until my sewing needle is hovering over the pin, pull out the pin and immediately hand wheel down the sewing needle. You will want to back tack a few stitches too here. If it isn't bullseye the first time, then just try again. Practice will make this easier for every time you do it.
9) Here I'm finished sewing. My white thread did not show up very well in the photos, so I drew on top with dotted lines. Dont forget a strip of lightweight or knit interfacing. It will help the structure of your split so much.
10) Here is a look at how it looks after both the front and the back split has been sewn.
11) Same situation as photo 10 but from a side angle. Clip the corners of the seam allowance for less bulk in the tip/corner of the split. You can also grade the seam allowance of the splits, so that you cut one down to 0.5 cm, so you don't have those two 1 cm seam allowances on top of each other inside the splits.

12) Now you need to turn your splits, one at a time. I put my finger as you can see here, all the way in the corner and then another finger on the inside, also as much in the corner as I can. Then I pinch that outer and inner finger together and turn. That way I turn the corner most effectively in the most gentle way. You can definitely give it another push in the corner with your preferred tool but sometimes they can over-push the corner and make it almost over pointy. But with this way you'll find that it isn't always necessary. I do often wiggle the corner too from the outside after turning, to turn it properly.
13) And here you see both splits has been turned but not pressed yet. In the middle you will see how all the four seams (the A&B points from both front and the back split) has meet in exactly the same point. If they don't, you'll either have a hole (you stopped sewing too soon) or you'll have stitches overlapping and you won't be bale to turn it all around properly (you stopped sewing too late).
14) Press the splits and you can now hem the top your preferred way. I did it with my Coverstitch machine. If you do not have a coverstitch machine but want the fabric edge finished anyway, I would serge the bottom hem before step 1) of this tutorial. You need the seam to be able to open up, so don't serge the hem after that little 1 cm hem seam allowance (B) has been sewn together.
And that's it. You can add this type of hem split to any top/sweatshirt with a similar shape. It doesn't require any special drafting. Just stop sewing where you want the split to start (point A). The splits can be same length or like here different, the technique is exactly the same.

And there's the split hem in action.

I just wanted to show you the back side too of this top because it's quite fabulous.
Thank you for reading.
Hi, Thank you for this tutorial it makes it so much easier when you can see what to do. I have a quick ( I hope) question for you. I have to a round back adjustment of about an inch which I have got reasonably good at by either including a back seem or putting darts in the neck area if I want to cut on the fold. On thing I am discovering in many patterns I get more fabric than I would like in the upper chest neckline area. How do I get rid of the extra fabric. Many thanks Sue
ReplyDeleteHi Sue. I'm so glad to hear that this is helpful. Regarding your questions, I'm afraid it isn't a quick question. It will depend on the style you're making. But you should look into the 'slash and gather method' it's the standard way of removing width from paper patterns (so it cannot be done after the fabric has been cut). It's in close family with the 'slash and spread method' which adds width to paper patterns. I do have a quite old and very lengthy blog post where I draft a skirt using those methods. You might be able to understand the concept from that post, even though it isn't exactly in the area you need it. Here is the link to the post: https://www.sewinglikemad.com/2013/05/skirt-week-2013-how-to-draft-custom-fit.html It is also situated in the tutorial section plus you can use the search function and write 'skirt week'. I hope this helps a little bit. :-)
DeleteMuch thanks for the tutorial and illustrating pictures!
ReplyDeleteI love split hems, but they can be tricky.
:-) Chris
Looks great! Love it
ReplyDelete,