
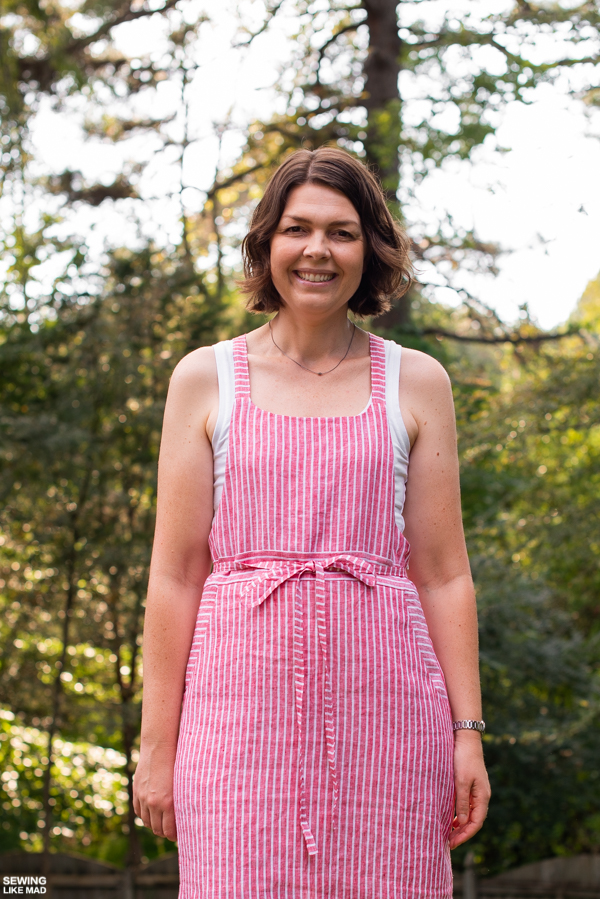
Okay, so maybe this stripy fabric makes it look like I'm really wearing an apron when seeing it straight on, but honestly I don't mind. I love my stripy Burnside Bibs Skirt or Simplicity 8641, Misses' Jumper Dress as they call it.

It's not that I have a ton to say about this pattern but enough that it would be very long for Instagram.
And I'm slowly catching up with the new times where blog posts barely gets any comments anymore. I started blogging when a blog post was sure to get lots of comments, so it took me years to get used to the idea of a comment on social media could have the same value. I know, it's silly but I'm just being honest here. No complaints. I have realized that blog posts are still being used though. Maybe not the day they post, but when doing research for your next project, or when you are stuck in your next project or wondering about something, etc. It's all good.

I will admit to not be completely head over heels in love with the Burnside Bibs Pants when they released. Well, I liked most of it but I thought the back gave people a bit of a diaper bum look.
And I'm not sure if I have just grown to like the diaper bum look OR maybe it's just a matter of sizing and fitting? But they certainly grew on me as I saw more and more people getting great results with them. But apparently not enough to actually buy the pattern. Or maybe it's just the thought of fitting anything jumpsuit/overalls on my tall frame, that just makes me tired. Until the day I saw that Sew House Seven had made a deal with Simplicity, allowing them to release a skirt version. (I assume that's how it works!?). I immediately went to Google and found an Etsy seller, who sold it at a great price. (About half price of what the Simplicity website is selling it for.)

As soon as I received the envelope and unpacked that annoying, thin and creased up tissue paper, I kind of regretted it. But then Blackbird Fabrics got some delicious looking black linen, which I bought with this project in mind and that gave me renewed energy to go on with it.
Although as you can see, my hands somehow reached for this stripy linen instead (also from Blackbird Fabrics) when I was ready to cut. Actually, the reason for that was pretty simple. I had finally found a project where that fabric would work. I bought it over the summer but I was kind of disappointed/surprised when I got it. It was thinner and more stiff than I hoped for. Not a good combination, ha. So it's a fabric not suitable for things that need drape and too thin for a lot of things where drape is not needed. Gah! I realized it was fairly simple to draft a lining for this style, so that became the solution. More talk about drafting the lining further down in the post.
And I'm SO happy for it. And I still want to make the black linen version which will be a perfect winter version, since that linen is thicker (and softer, phew).

I think using this thinner material the first time around was a blessing in disguise. Because I did end up with a bit of a diaper bum because of sizing issues, and thicker fabric would have made it worse. Now I can fix that for the next one I make.
My issues were not the pattern's fault. It's a consequence of my wider hips and narrow waist. Yup, the good ol' pear shape.
I've talked over and over about how important it is to try on your sewing projects many times during the sewing process. But this style is actually hard to try on before it's practically done. The reason for that is the belt loops that hold the straps in place. Those belt loops are sewn on pretty much as the very last step. So of course I tried it on along the way but frankly it was hard to get a real impression. Sure I could check it was wide enough for my hips. But the waist part was hard to check along the way.
Yes, a muslin might have been a smart solution for this style for someone with my body type. On the other hand it's also a style that is very flexible. Straps can always be adjusted every time you put it on and the top of the back skirt is supposed to be somewhat gathered, so that's also flexible. But for my personal taste I think the top of my back skirt needs to be gathered a tad less. It's okay for now but could be better and it's not a hard fix for my next version.

Here is a close up of the back arrangement. So you cross your straps on your back, slide them through the row of belt loop from each direction and then around your waist and tie in the front.
And let me just mention a thing that might be logic but nevertheless stopped me for a second, before I wrapped my head around it. The front part has a skirt and a bib in two separate pattern pieces. But the back skirt is only one piece, lengthened to go up to meet the top of the side seam of the front bib. I'm only saying this as a help, not because there is anything wrong with that!
Also the narrow waist piece (here with horizontal stripes) is sewn on top of the bib piece. It's not an extension. That also initially confused me.
I always put the paper pattern pieces together before even started cutting fabric. That way I know the whole sewing process before I'm even started and won't be missing steps or doing things in the wrong order.
It's not that anything I'm telling you is not in the tutorial. I'm just more used to figuring it out just by looking at the pattern pieces. So this is just a helping hand to those of you who do the same.

And just to get back to sizing for a moment because oh boy, was I in for a surprise. And this might be a common knowledge for the Big 4 sewing patterns (?) but I got my size rather wrong. I bought the envelope containing size US 6-14 without any further research and I thought for sure that I would fit in there somewhere.
Turns out my hip measurement is actually a size 18 in this pattern. Ooookay, quickly starts chanting: "It's just a number, it's just a number!"
Luckily widening a skirt at the hips is not the hardest job in the world, plus I knew I had to make the top of the skirt smaller anyway, so it wasn't like I was able to fit it straight out of the envelope anyway.
The skirt turned out perfect at the hips but like I mentioned earlier in the post, next time I'll make it even smaller at the waist, for less back gathering/diaper bum effect.

The pattern has different options such as skirt length, pocket type or straight vs curved 'neckline'. You can of course mix these options as you like but I made a straight version A. Mid leg skirt length with a side slit (don't forget a strip of interfacing on the seams), pockets where the pocket bag is inside the skirt (interface the pocket opening), (and the other option is a patch pocket) and a curved 'neckline' (yup, interface that seam too).
You need to insert an invisible zipper (you got it, a strip of interfacing on the seams before sewing on the zipper) and I have some tips for you in THIS rather ranting Instagram post and THIS tutorial here on my blog.

And then there is the lining. Which I didn't draft a paper pattern for but sort of just used the existing skirt pattern plus my knowledge about how to draft a lining.
Great, I'm being super helpful, huh!
Let me try a bit harder here. So the back skirt is finished with a facing. And that facing is drafted long enough to meet the bottom of the bib. Awesome! This way, if you do your math right (which I didn't quite do, ha) you can get your lining to match up on the inside too. Yeah, I'm being sneaky and is only showing you the side I did change to match up. I got lazy on the zipper side, since it was on the inside only.
So for the front skirt lining you just use the skirt pattern as it is, but don't cut out the pocket openings if you are making that option. You need the full skirt pattern (line up the full pocket bag to fill out the gap). The actual pocket bags will be hidden between the lining and the skirt fabric. (sorry, that's random info but I see this question a lot).
The back skirt lining is a tad more complicated, but just a tad. You take the back skirt pattern and subtract the height of the facing and then you ADD back two times seam allowance. One for the facing and one for the lining.
And you might be thinking now, wait, she couldn't even get that math right? Ha ha. I don't blame you! But to make things really confusing for myself I also changed the seam allowances to my preferred 1 cm / 3/8". Some places without changing anything (to make it longer or wider). And other places, where I couldn't just change it to my liking because it would means things wouldn't line up, by adjusting the pattern. At some point I think I lost my overview of my changes.
If this is your first time working or drafting a lining, then I'll really really recommend you to actually trace the pattern and make a real lining pattern. Not only will it save you time in the future but it's also a WHOLE lot easier to both see what you are doing and actually check that your lining is correct before even cutting the fabric. Remember you can always check your paper pattern but putting it together like a puzzle. I even do a first time paper pattern fitting that way. Just to get a very very general idea about length and lines and stuff.
I've made a ton of linings in my time and I still should have followed my own advice.
I didn't make my lining full length. Just right above the slit. That's definitely the easiest way to do it and it gets the job done.

SO, who needs some barbecuing done?
I’m so happy to read your post about this dress, Mie! I bought this pattern (in both size ranges since I got the pattern on sale and figured my pear shape might span both envelopes!) and I’m hoping to make it soon. I love your striped dress and appreciate all of your sewing tips.
ReplyDeleteI'm so glad you blogged, because this was a fun read - and definitely more than you could have fit on IG! ;) I'm forever trying to convince myself that Big 4 are worthwhile, but you have reminded me of all the reasons I love indies! I do think your finished garment is really lovely!
ReplyDeleteI'm so glad you blogged about this dress (and I'm so glad I waited until you made yours first so I could benefit from all your knowledge)! All your tips are so helpful, and I will definitely be coming back to consult this post when I get around to making my dress.
ReplyDeleteI read it! I enjoy your blog because #miessewingtips. They are always helpful even if it’s something I haven’t made or going to make so keep on keeping on. And you can come over anytime and barbecue for me! It’s cute on and I think the black version is going to be amazing.
ReplyDeleteSara
Love your Burnside jumper! I'm making up the Claudia now by Tessuti which is very similar minus the waist ties and I have to say I love this pattern and look with a tee! I'm not crazy to have a tie around my waist (since I don't really have a waist) but every time I see this Burnside in either the jumper or the jumpsuit version I love the way the ties go around the back into those giant size belt loops.
ReplyDeleteI also started blogging before social media was hot so I totally understand your thoughts about the comments! Many of my favorite bloggers have also switched from blogging to Instagram which I think is a pity: I love extensive blog texts! So thanks a lot for all the tips, you inspired me to buy the jumpsuit version of this pattern. Because, well, I might just sew a jumpsuit for my 1m84 length. (Tons of adjustments, yup. You can laugh at me afterwards.)
ReplyDeleteMie, once again thank you for sharing alk the wobderful tips! The skirt looks pretty cool. I live those side slits 😍 i see what you mean about the bum. I think it looks good but I know the next one you make will be awesome! I need to re-read your tutorial about zippers.
ReplyDeleteLove a good blog post! And love it when people take the time to comment! Thanks for this review xx
ReplyDelete