Showing posts with label Tutorial. Show all posts

Saturday, November 6, 2021

Hope Woven Dress by StyleArc

 Today's post is an example of how a simple shape can sometimes cause some troubles if you don't happen to fit the original draft. And when it comes to raglan sleeves, I rarely do. When a shape is simple there are no design details to hide or distract from the fit issues.

The Hope Woven Dress from StyleArc is a popular style exactly because of its simplicity. Deep 3/4-length raglan sleeves, a gathered skirt and a facing in the neckline. A fast make and a relaxed and comfortable style.

I want to be clear from the start, this is not one of those 'honest reviews' where there is a problem with the pattern. This is a post to show you how I adjusted part of a pattern to fit my body. It's more normal than not, that we don't fit the standard draft. Or we fit them in some areas and not in others. Especially because standard drafts vary from company to company. I think we are all looking for that company where however our body is, fit their standard as much as possible. I felt I found that with StyleArc but that does not mean I don't have to do adjustments. Certain things we almost always have to do, for me it's usually length (I'm 5'10"/178 cm tall). Or if I'm making non-elastic pants I have to blend sizes between waist and hips because those two areas do not fit into the same size. 

And my small bust and fairly narrow waist often puts me in dress or top/blouse sizes that my tall frame shoulders doesn't fit into. Which, like mentioned earlier, can cause some 'interesting problems' with raglan sleeves. 

So let's get nerdy and talk about how you fix that if you are in the same boat! And even if you are not in the wide shoulder boat, this post might still be useful for you.

Wednesday, March 24, 2021

Tutorial, Hem Split Opening for the Balmain Knit Tunic, Style Arc

When I realized that I had more photos for this tutorial, than the allowed 10 photos for one IG post, I did a survey in my Stories on IG, asking if you preferred the tutorial split up in two posts on IG (part 1&2) or here on the blog. Guess which won...haha.

If you want to read my other info about this make, size, fabric etc, you'll have to go read THIS post on Instagram.

Monday, August 24, 2020

Tutorial: Bagging Method for Lining of Sleeveless Dress & Nova Midi Dress by StyleArc.

I've been wanting to write about this subject AND to do this tutorial for a very long time. As you will learn later on, the tutorial is sort of connected to the subject. 

I've been thinking, that even though most of you who are reading my blog are home sewists, you might find it interesting to read about how industrial sewing techniques can have different rankings in the professional fashion industry. All within the industrial sewing techniques. I know some of you who follow me are also interested in learning how to end up with professional looking results when you sew, and this article might be of particular interest to you. 

The tutorial is for using the bagging method when sewing a lined, sleeveless bodice. It can be used with a bodice with or without a zipper. In this case it is without.


The dress in this post is the Nova Midi Dress from StyleArc. There are more photos plus size and fabric info in THIS post from my Instagram account.

Saturday, November 9, 2019

How to Measure and True Seams, Tutorial.

Normally I post about a make and then I add whatever relevant tutorial or technical info to go with it in the post. This will be more of a technical post. Normally I would do those on my Instagram account (under the hashtag #miessewingtips ) but I think it will be too condensed in that format. So let's try this, and see how that goes.


I'm going to try to cover both very basic knowledge, but also a few more steps from that. And I've noticed that just because you are an experienced sewist, it doesn't necessarily mean that you have pattern knowledge, besides how to sew from them. So hopefully this will be helpful for a big group of people.

Thursday, September 26, 2019

Besharl Jacket by Style Arc Patterns

Alert: Monster post ahead.
I don't even know what happened, ha! Actually, I do! Allow me to explain.

This post is both an inspiration post with three different Besharl Jackets (a pattern from StyleArc), a warning to not be as dumb as me, small tips about how to improve fit if needed, and lastly a couple of tutorials on which techniques to use to get a very nice finish on the inside. They will be useful for lots of styles. Not just this one.

Monday, August 26, 2019

Clare Pants by StyleArc

I wanted to make a blog post about these Clare Pants from StyleArc because I figured out some sewing tips along the way that I wanted to share with you. Plus you'll want to read this post before deciding which size to make.


I made a pair in Blackbird Fabrics' 7 oz glorious linen. Black is sold out but there are a ton of other colors.


Friday, August 9, 2019

Bob Woven Pants by Style Arc + Pocket Tutorial

I have felt a certain pressure to post about the Bob Woven Pants from Style Arc. Positive pressure that is. Lots of people are excited and interested in these pants but also a bit sceptical because of the curved legs. 


Friday, April 26, 2019

Salida Skirt by True Bias

This is going to be one of those posts. The post where I have critiques about the pattern. I don't like making those but I also don't like not doing it. It might be a personality thing but it eats me up when I see what I consider mistakes. And not because we are not allowed to make accidental mistakes, we all do, my goodness. But when I see something that is not helpful or can cause confusion and which should be there, that eats me up and I just have to talk about it. Because patterns are a big part of many people's learning process. 

Saturday, January 26, 2019

Loren Woven Jacket by Style ARC and Pivot Tutorial.

Two blog posts in a week....do not get used to that from me, ha!

But this one contains a pivot tutorial that is useful when sewing my previous make the Olya Shirt from Paper Theory, so they had to be published close to each other.

Today I'm showing you another favorite make, the Loren Woven Jacket from Style ARC.

Thursday, January 24, 2019

Olya Shirt by Paper Theory

In recent times I usually only make a blog post if I have a lot to say or if I have a relevant tutorial I want to post together with the pattern. That might not be the case with the Olya Shirt from Paper Theory. I simply just think that pattern deserves a blog post, ha. It's on my top 10 of favorite things I've ever sewn, maybe even top 5. 
Actually I do have a tutorial I want to post with this pattern but I forgot to take the photos while sewing this shirt (doh!), but luckily I needed the same technique for the next thing I sewed, so I'm going to put it in that post instead and link from this post. You can find the tutorial HERE.

Friday, August 31, 2018

Ruri Sweatpants, Named

It's funny how you sometimes just think you are going to make some sweatpants with some fun details and you end up with several muslins and some serious pattern alterations.

Edited: It's also funny how you start on a blog post in the end of March and it's now the last day of August and I just spent 15 minutes finishing this post. Sheesh, get it together woman!

But at least it worked out in the end.
This is a post about the Ruri Sweatpants from Named Clothing.

Friday, May 11, 2018

Ariana Woven Dress, Style Arc Patterns

May I present you the fabulous Ariana Woven Dress from Style Arc.

While I sewed it, I was thinking of all of you, so I actually remembered to snap a photo here and there when there was something I thought would be useful to know, both if you also want to make this dress and/or in general.

I guess you can consider this post a #miessewingtips x 10.

Thursday, April 19, 2018

Eden Knit Dress, Style Arc

I don't think anyone would doubt that this dress is right up my alley.

It's knit, it's swingy and it has some interesting lines which of course, duh, calls for color blocking.

This is the Eden Knit Dress from Style Arc.

Sunday, August 27, 2017

Oversized Sweatshirts and Knit Pencil Skirts

I feel like my sewing is rather random most of the time. If I have a plan it usually gets overtaken by something else that catches my attention. Or if I buy fabric with the intention for a specific pattern, I would say three out of four times it ends up as something else.

Not this time.....

Tuesday, November 1, 2016

Three Versions of the Kastrup Top.

 Today I'm very excited to show you the three versions of the Kastrup Top from the Danish pattern maker How To Do Fashion. It's not me who has been pattern hacking. You actually get all three versions when you buy the pattern.

Nanna is the ÜBER stylish lady behind these patterns and she has the most amazing vintage style. Seriously follow her on IG if you don't already do that!

Tuesday, October 18, 2016

The Everyday Blouse + Mini Side Slit Hem Tutorial

Today I'm giving you another post that includes a mini tutorial. I kind of enjoy making those....more than a big twenty photos full garment type of tutorial at least.
So when I'm sewing a little detail that I think you might be interested in, I simply snap a few photos with my phone which I usually have at hand and get the best out of it.


This is the Everyday Blouse by House of Pinheiro/UpCraft Club. And the mini tutorial is for a side slit hem.

Friday, August 12, 2016

Skirt with Exposed Elastic Waist - Tutorial.

Okay, this is almost ridiculous! These photos are like a year old but luckily sewing techniques don't expire overnight and a skirt with (exposed) elastic waist will probably never run out of fashion. And Mo Willems Pigeon is certainly a classic soooo I think we are good.


Wednesday, November 18, 2015

Japanese Shirt Pattern plus Vertical Button/Buttonhole Placement Tutorial.

The first Japanese Sewing Week has started and I sort of cheated my way into it. But I will tell you about that later.
The series is arranged by my good and talented friend Sara from Made by Sara. You can read all about the series HERE. In that post you can also find a link party so YOU can join in on the Japanese sewing fun.
In the end of this post you will find a great giveaway with prizes such as Japanese Sewing books from Tuttle Publishing and a fabric voucher to Urban Sew.  


You know what a giant fan I am of Japanese Sewing patterns. Not only of the aesthetics but just as much because I 8 out of 10 times agree on the suggested technique - which I find remarkable since techniques can be somewhat of a subjective matter. I'm always in awe of the illustrations in the books. They are clear, precise and informative and 100% make up for the fact that I (obviously) do not understand a word of the Japanese tutorial text.

It was the great and informative Japanese Sewing Book Series on the blog You & Mie that gave me the bits of information that I needed (e.g. the japanese sign/word for CB which is always good to know, right!) to dare to try them out and I have not looked back since. I highly recommend that you start there if you have never tried sewing from them before.


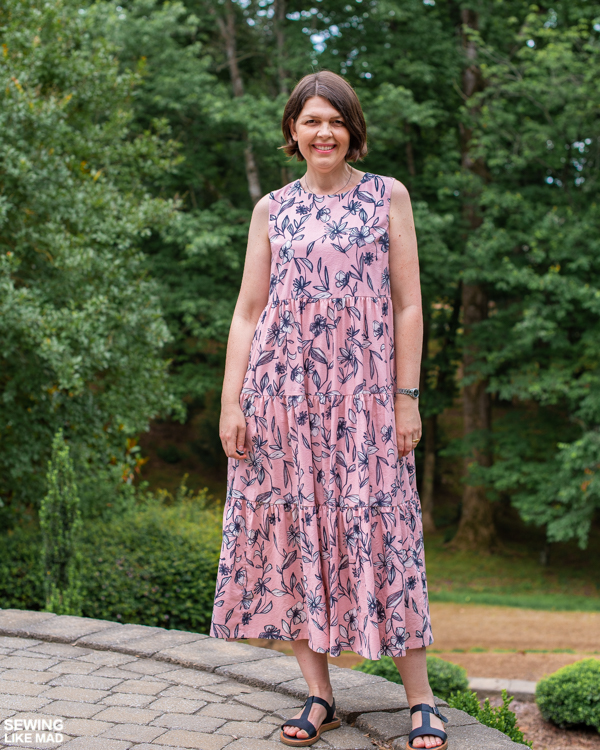
Let's get to my contribution. I have dreamt of making this shirt ever since I saw Celina making it for the Shades of Me series. Find the post HERE.

It is from the book Simple Chic. I also made those two knits tunics I posted about two weeks ago from from that book. 

So how did I cheat myself into the series. Well, you know that I try to stay away from series because they come with a deadline and that does not work so well for me since my blog is a hobby. BUT when I got the invitation I had already made this shirt. It was hanging in my sewing room and was just waiting to be photographed, so that was exactly the kick I needed to get it out of there.

The reason for the procrastination was because I was not sure it turned out the way I hoped. More precise I was worried that the fabric (delicious organic cotton double gauze from Organic Cotton Plus) did not have enough drape for this type of shirt and that I looked more square than you are suppose to in styles like this.

So it was actually only when I looked at the photos that I realized that I actually really like it on me and I have used it many times since, doh!


I changed the pattern a little bit. The book both have a dress and a shirt version and I made something right in between - I guess you can call it tunic length.

It's pattern C and it only comes in one size which took me quite a while to figure out while I looked the pattern sheet over and over haha. So now you are spared that waste of time!

It is a VERY roomy style (and a fabric with lots of drape (silk, rayon etc) would work great with the original shape - just like Celina's.
So after making a muslin and knowing that I would make it with double gauze, I ended up making it quite a lot more narrow. I took 2.5 cm / 1" off the CB bodice piece and then the same from the front center piece. But I took it off on the side that is sewed together with the front side piece not at the very center where the buttons are. (I hope that makes sense?!)
So it became 10 cm / 4" less wide in total. 

If you remove from the center back piece just remember also to adjust your collar piece otherwise it will be too big. In other words you are making your neck opening smaller too.


Here is a look from the back. 
And for the 100th time did I wish I had a stylist with me when I'm taking photos that could just give that collar a hand stroke so it would lie down nicely. Yeah, I know...I'm obsessing over tiny ridiculous details!

I made the shirt version and added length to it. You could probably also choose the dress version and shorten it. (I think the collar fits both since the styles are called C-1 and 2 but I haven't actually checked).
I think I added about 15 cm / 6" to the length in total. I didn't bother to add any width at the bottom even though it would now had to cover my bum because I knew those gathered side inserts would add plenty of width.

I absolutely love those gathered side inserts and I'm almost feeling proud of myself for not color blocking them.....at least this time.


I have wanted to talk about button placement forever and well, this post is as good as any, right. Especially since it contains a garment with buttons, haha.

Buttons are not placed in the middle of a buttonhole. 
I'm going to focus on vertical buttonholes in this post and a button is placed so that the stitches used to sew the button in is holding the buttonhole in place. So you button your shirt and then you pull the side with the buttonholes down (the wearer's right side if you are a woman and left if you are a man) and at the same time pull up in the side with buttons and boom you have a shirt placket that stays in place.


And I know it looks like I totally screwed up the placement of those side pieces with gathers (another thing to think about when placing buttons: lining horizontal lines up across from each other), and I have several times gasped and grabbed my measuring tape but they ARE at the same height. It's simply because of the width of the shirt that it does not always looks like it. I'm the type that could not handle one being higher than the other....I know, I know I need help, hehe.

Okay, back to the tutorial:

SO to measure where to put your buttonholes you start by placing your top button on the garment (where it eventually will be buttoned through a buttonhole and end up being visible). The buttonhole has to start 2 millimeters above the top hole(s) in the button. Use your preferred way of marking buttonholes. I stick a pin through the top hole of the button and then I lift the button off the pin and move the pin up 2 millimeters. (I use slim pins with a tiny head all in metal in case you wondered).

Next step is deciding where you want your lowest button placed. Marking method is obviously the same.

I realize that many women have to start by determine where the button over their bust has to be placed as the very first thing (to avoid gaping over the chest) and then place buttons upwards and downwards from there but the principles are still kind of the same although the math is of course a tiny bit different.

Third step is to decide/determine how many buttons you want on your placket in total. I simply play around with the buttons and see what looks the best. You obviously do not want a too big gap between them and you do not want a too small because that means more buttonsholes to make, gah.

Now that you have determined/decided on total number of buttons, you need to measure from the start of the top buttonhole to the START of the bottom buttonhole, divide with ONE LESS than the total numbers of buttons, mark all your button holes and get started.

Let's do an example:

So if the total number of buttons are 8 like this shirt and the full measurement (from top buttonhole to top of bottom buttonhole) is 60 cm / 24". Then divide 60 cm with 7 (one less than the total number of buttons remember). That will give you the measurement from top to top of each buttonhole all the way down: 60 / 7 =  8.6 cm.

I don't know if anyone need this information or everyone is doing it this way but hey, now it is here!


I also wanted to give you my opinion about when to use vertical buttonholes versus horizontal buttonholes. 
So in my opinion as soon as there is a placket or a stitch creating a placket effect I think vertical buttonholes looks the best.

In other words the only times I use horizontal buttonholes are in blazers, vests or skirts with no stitching along the front. I have two reasons for it and the first one is pure aesthetics (and therefor subjective). The other reason is more practical but since I'm not talking about horizontal buttonholes in this post I'm going to save it for another time, sorry but this post is already long enough, ha.  


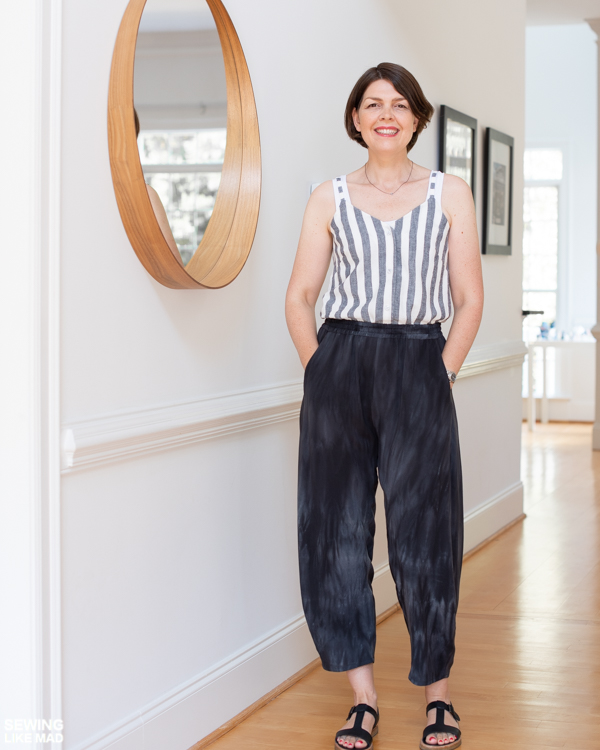
Lastly I wanted to give you an example of how to style it for another occasion.... like leaving the house and not pick up kids or go grocery shopping, hehe. I love the contrast of the cropped jacket with the long tunic under. The jacket is from my favorite Danish brand Baum und Pferdgarten and after borrowing it from my sister so many times she finally gave up and gave it to me. Yippie.


Okay, I definitely think I need to stop rambling now and you need to enter this giveaway is you haven't already!


Good luck!


And please check out all the other incredible participants. They truly are an honor to post together with!
There will be links to all the posts on Sara's blog HERE.

Thank you!


Friday, January 9, 2015

From Dress to Shirt - Pattern Remix Tutorial

So like promised in yesterday's Mini Hudson Pants post here comes a mini tutorial on how you in a few easy steps can change the original dress pattern from the book Happy Homemade, vol 5 by Ruriko Yamada to this shirt.
Just to be clear you will need the book to make this shirt. I'm only giving you the information to the changes I did.

Tuesday, November 18, 2014

Pretty in Peplum Dress by Sew Much Ado

Little miss Toothless would like to present you her two new Pretty in Peplum Dresses
She loves those dresses and so do I. 
The pattern is designed by the lovely Abby from Sew Much Ado and she has done an amazing job making a pattern that is not only super pleasant to work with but also results in a dress that is comfortable to wear but looks super stylish.