Showing posts with label Pattern drafting. Show all posts

Saturday, November 6, 2021

Hope Woven Dress by StyleArc

 Today's post is an example of how a simple shape can sometimes cause some troubles if you don't happen to fit the original draft. And when it comes to raglan sleeves, I rarely do. When a shape is simple there are no design details to hide or distract from the fit issues.

The Hope Woven Dress from StyleArc is a popular style exactly because of its simplicity. Deep 3/4-length raglan sleeves, a gathered skirt and a facing in the neckline. A fast make and a relaxed and comfortable style.

I want to be clear from the start, this is not one of those 'honest reviews' where there is a problem with the pattern. This is a post to show you how I adjusted part of a pattern to fit my body. It's more normal than not, that we don't fit the standard draft. Or we fit them in some areas and not in others. Especially because standard drafts vary from company to company. I think we are all looking for that company where however our body is, fit their standard as much as possible. I felt I found that with StyleArc but that does not mean I don't have to do adjustments. Certain things we almost always have to do, for me it's usually length (I'm 5'10"/178 cm tall). Or if I'm making non-elastic pants I have to blend sizes between waist and hips because those two areas do not fit into the same size. 

And my small bust and fairly narrow waist often puts me in dress or top/blouse sizes that my tall frame shoulders doesn't fit into. Which, like mentioned earlier, can cause some 'interesting problems' with raglan sleeves. 

So let's get nerdy and talk about how you fix that if you are in the same boat! And even if you are not in the wide shoulder boat, this post might still be useful for you.

Wednesday, May 13, 2020

The Wilder Gown, Pattern Review

Forever ago, I promised you a review of The Wilder Gown by Friday Pattern Company.

I mentioned I was a bit disappointed over parts of this pattern, and naturally I would like to elaborate. 

Wednesday, November 20, 2019

The Sapporo Coat by Papercut Patterns, Review.

THIRD EDIT, Oct 31st 2020: Alice from the blog Queen of Darts have used this post to go through the 2.0 version of the pattern. See her conclusions HERE. Thank you Alice!

SECOND EDIT, Dec 17th 2019: Papercut Patterns has released a new and updated version. I don't know exactly what has been changed. But my blog post should be able to help you check your new version without my help. THIS post from Papercut Patterns explains how to get hold of the new version, if you already purchased the old version.

EDIT, Nov 21st 2019: Since posting this review yesterday, Papercut Patterns has pulled the Sapporo Coat for review. Hopefully they will come to the same conclusions as me and fix the pattern. They have left a comment on my Instagram post HERE and said, if they end up updating the pattern, they will replace the patterns to those who already purchased it. 
So far, so good! 
------------------------------------
There's a first time for everything, and today is one of those occasions. I'm posting a review about a pattern I haven't sewn. I did intend to though! But I have limits to how many mistakes I'm going to fix and this pattern way overtakes that number. But the number one reason for deciding not to sew it and still write a review about it, is two sides of the same thing. The thing is, the design of the Sapporo Coat is fabulous. People look fantastic in it, there is no denying that. I most likely would too if I made it. But I don't want to help 'promote'* a pattern that not only has quite a few technical mistakes but also includes a ton of bad sewing practice. 
*here in the sense of putting another good looking Sapporo Coat out in the already brimming pool of mostly good looking Sapporos. I paid for this pattern myself!


Saturday, November 9, 2019

How to Measure and True Seams, Tutorial.

Normally I post about a make and then I add whatever relevant tutorial or technical info to go with it in the post. This will be more of a technical post. Normally I would do those on my Instagram account (under the hashtag #miessewingtips ) but I think it will be too condensed in that format. So let's try this, and see how that goes.


I'm going to try to cover both very basic knowledge, but also a few more steps from that. And I've noticed that just because you are an experienced sewist, it doesn't necessarily mean that you have pattern knowledge, besides how to sew from them. So hopefully this will be helpful for a big group of people.

Friday, April 26, 2019

Salida Skirt by True Bias

This is going to be one of those posts. The post where I have critiques about the pattern. I don't like making those but I also don't like not doing it. It might be a personality thing but it eats me up when I see what I consider mistakes. And not because we are not allowed to make accidental mistakes, we all do, my goodness. But when I see something that is not helpful or can cause confusion and which should be there, that eats me up and I just have to talk about it. Because patterns are a big part of many people's learning process. 

Friday, August 31, 2018

Ruri Sweatpants, Named

It's funny how you sometimes just think you are going to make some sweatpants with some fun details and you end up with several muslins and some serious pattern alterations.

Edited: It's also funny how you start on a blog post in the end of March and it's now the last day of August and I just spent 15 minutes finishing this post. Sheesh, get it together woman!

But at least it worked out in the end.
This is a post about the Ruri Sweatpants from Named Clothing.

Sunday, August 27, 2017

Oversized Sweatshirts and Knit Pencil Skirts

I feel like my sewing is rather random most of the time. If I have a plan it usually gets overtaken by something else that catches my attention. Or if I buy fabric with the intention for a specific pattern, I would say three out of four times it ends up as something else.

Not this time.....

Friday, February 17, 2017

Amelia Earhart Costume with Conifer Jacket.

What is going on? A homemade costume on my blog and we are months and months away from halloween.

A biography project in school and a sold out costume is what happened! 


Tuesday, November 1, 2016

Three Versions of the Kastrup Top.

 Today I'm very excited to show you the three versions of the Kastrup Top from the Danish pattern maker How To Do Fashion. It's not me who has been pattern hacking. You actually get all three versions when you buy the pattern.

Nanna is the ÜBER stylish lady behind these patterns and she has the most amazing vintage style. Seriously follow her on IG if you don't already do that!

Tuesday, August 20, 2013

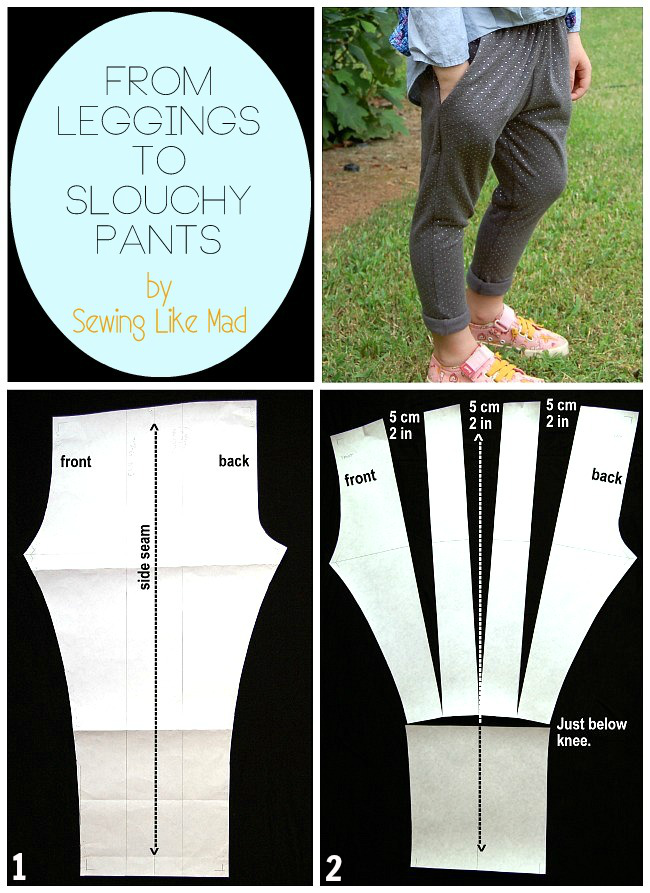
From leggings to slouchy pants. Easy pattern alteration tutorial.

This month we decided to divide my Sewing Rabbit Creative Team post up in two parts.
On Me Sew Crazy you can get some tips to rethread your serger and unpick your serger stitch the absolute easiest way. If you do not already know these simple tricks they are going to blow your mind (I hope, haha).

And here I am showing you how to with a few steps can transfer your leggings pattern into a pair of stylish but still super comfortable knit slouchy pants. 


Before we start the tutorial I just want to add that it is a 'real time' tutorial so I actually ended up with two fittings and extra adjustments before I was satisfied and you are getting it all in the photos below.


1: Start with a basic legging pattern. This one self drafted. But there are several great tutorials for self drafting leggings out there in blog land. THIS one from 'One Little Minute' is very detailed. And THIS one from 'Make It and Love It' is the fast one where you trace another pair of leggings. And if you are not the self drafting type then 'Go to Patterns' have their bestseller Go To Leggings pdf sewing pattern for sale at their web shop HERE. In other words lots of options!

2: The first thing you do is copy your leggings pattern because you have to start cutting into it to add the width. Because I only wanted the width in the thighs I first cut of the pattern around the knee. Then I made some vertical cuts in the top part all the way down to the knee line so that the paper only just stays together with like a thread. And then I spread out the pattern as seen above on photo 2.


3: Then you trace the new shape to a new piece of paper. Don't worry about the curve that happens to the knee line when you spread out the top part. Just reattach the lower knee piece to the spread out top part like photo 2 shows - so the sides are touching. To lower the crotch seam we have to make the crotch seam longer, right! So I am adding 3 cm ( 1 3/16 in ) to the top of the pattern as seen on photo 3. That is much easier than lowering the bottom front and back seam and the result is in my opinion the same.

4: Now I thought I was done and sewed up a sort of a wearable muslin - if they were good that is! 
Hmmmm, I was not completely satisfied but I knew I was going in the right direction. The width in the upper thighs was right but they were too tight around the knees. I only wanted them to be tight under the knees. 
As a side story this first version ended on my three year old. Since she has shorter legs the thigh width fitted her perfectly (get it? The distance from top to knees are shorter, right!). They are of course too long in the full length but with a few roll ups (or an alteration if Mommy would ever get around to that (don't think so)) and they are good to go!   

Okay, carry on now Mie......


5: Here you see what I added to the pattern after the first fitting. I also thought they needed a bit of extra length only in the back crotch seam (sorry, I have no photo of that so you just have to take my word for it.) but since I was already adding to the thigh width I also added a bit to the back crotch seam. In the front I only added to the thigh, knee and a tiny bit to the lower leg.

6: Time for second wearable muslin and this time I was satisfied.


7: I wanted to add pockets to make them more pants alike. So I simply traced my pattern again. This time making a front and back pant pattern piece by simply splitting the pattern at the seam side - just remember to add seam allowance. If you need help to draft a side pocket pattern I have made a tutorial for you right HERE

8: DONE! These are made in this really soft grey cotton jersey with tiny silver dots from Girl Charlee - seriously where else, right!


That is all for me today. Thank you!

Follow on Bloglovin

Tuesday, August 13, 2013

Side Pocket Pattern Drafting and Sewing Tutorial.

I guess we can call today's post a bit of a recycled but also upgraded post. This tutorial was first brought back in November last year as part of Elegance & Elephants' Knock it Off-series but has never been brought home here to Sewing Like Mad.

The photos have been reedited and the text corrected where needed.
This is a tutorial on how to add a side pocket to any pants pattern plus how to sew the pocket bag with French seams.


1: Start on your front pants pattern and draw the line for the pocket opening. There are no rules - it is more a matter of design and what look you want to give the pants - but remember you have to make the opening big enough for a hand to enter.

2: Add seam allowance to the pocket opening.


3: Now it is time to draw the line for the pocket bag incl. seam allowance. Again there are no rules but there has to be room for a hand in there.

4: Now you can very precisely trace two pocket bags. The only difference in the two pattern pieces are (as you can see in photo 4) the left top corner. The back pocket bag follows the outer line of the pants and will be visible when the pants are done (which mean you can either play with contrasting fabric or use the same fabric as the rest of the pants are made of)  and the front pocket back follows the pocket opening.


5: Now you can cut away the top left part of the front pant pattern because you will have the back pocket bag to cover that bit. It is important to note here that I will cut the pocket bags in the same fabric as the pants them self which is obviously the easiest but not always possible. You can do it if the fabric is thin like here but in thicker fabrics like denim, wool or corduroy you will have to do a little extra pattern drafting and sewing but soooorry I won't show that in this tutorial.

6: If you are a bit confused like me and cut the pants first and then realized I wanted pockets you can use the little top left piece you cut of (see photo 5) to cut that bit of your already cut pants - ahem, great planning here! 
It is always a good idea to put a line of interlining along the pocket opening (on the wrong side of the fabric of course) to avoid the pocket opening to go wavy after sewing.


7: Sew the front pocket bag to the pants in the pocket opening right side against right side of the fabric.

8: To sew the front and back pocket bags together with a french seam you have to first sew them reverse against reverse side of the fabric.


9: Then you turn the pocket inside out and seal the overlock seam (see photo 8) with a stitch and after you have ironed it you will have a very nice looking pocket bag.

10: Here you see the pocket from the front. Easy? yeeeees!


And here you see the finished pair of slouchy pants perfect for play, fall and back to school attire.

Monday, June 17, 2013

SONP 2013 - Elastic waist skirt with in-seam single welt pockets - TUTORIAL.

Holy smokes do I have a tutorial for you guys today.
This is part of Summer of No Pants 2013 (SONP) on the great blog Hideous! Dreadful! Stinky! (yes I know, that name is hilarious! And since I had the pleasure of meeting Marigold (and how is that for a cool name by the way!) at Fabric Weekend, LA I can tell you she is exactly the opposite - beautiful, clever, funny....and not stinky at all, ha!) So if you are coming by from there....welcome to my blog! 

So what are we doing today you might ask? Well, around a year ago I made a pattern drafting tutorial to THESE elastic waist skirts with pockets and when I got the chance to do a tutorial for SONP I thought hmmmm, I have actually never made a sewing tutorial for that type of skirt. That changes today! Being the annoying person I am, of course I had to change something from the skirts I have already made. And I came up with this in-seam single welt pocket (yes, I have totally gotten help to that description - thanks Shannon!).
But the measurements from the pattern drafting tutorial are still working and I am giving you the info you need for these pockets in this post - I hope...otherwise please feel free to ask!!
Let me first give you a short explanation to the magic change of fabric and colors along the photos in the tutorial...argh, I know!! So I was sewing the orange and coral skirt and taking the photos for the tutorial along the way. When I was done sewing I uploaded the photos and saw that the photos for sewing the single welt on the skirt - and this is for sure the hardest part of this skirt - does not work at all - grrrrrrrrrrr! SO what to do...well, the easiest solution for me, since I can't do graphic design, is to simply cut another skirt and photograph the steps I needed again. And this time I got what I needed. But there was no way I was going to make another skirt in the same two fabrics (I am not that crazy) and since this neon pink polka dot from Michael Levine had been calling on me since Fabric Weekend I decided to use that instead. You can see the other finished skirt HERE.

So now that we are past the little bumps on the way let's get this tutorial started, shall we!

I am only showing you the pattern piece for the front skirt because the back skirt is exactly the same as the one showed on in the pattern drafting tutorial - except you have to cut of that top strip for the color block piece and add seam allowance (if you want the color block version of course).
I am adding interlining to the 6 x 20 cm welt pocket pieces. I would for sure recommend you do that too so that the pocket openings holds up.
After you put the interlining on then fold and iron the welt pocket pieces so they becomes 3 x 20 cm - right side out.

And now I hope the photo collages should tell you the rest you need.


I do have one small change that I only did on the neon pink dot version. Before sewing the side seams together on the waistband, I cut of 1 cm on each side of ONLY what then becomes the front waistband. That way the side seam and therefor also the pockets gets pushed a bit forward on your body and simply looks better when the skirt is worn.


And now to the finished result worn by yours truly.

Oh and this is the full skirt version and the neon pink dot/yellow is the less full version. (You will understand what I am talking about when you see the pattern drafting tutorial.)

That's all for me. Thanks Marigold for having me.

Monday, June 3, 2013

Culottes, Pattern Drafting Tutorial

I realized I have done a few tutorials as guest posts but I have never brought them home to my own blog which is kind of silly because that makes linking them up on my TUTORIAL page a bit complicated. Soooo here comes one of them from a guest post last summer on the lovely Justine's (which I now after Fabric Weekend consider my friend - we were roomies and boy is she funny!!) blog Sew Country Chick. This is part one that focus on drafting the pattern for the culottes. For part two, which is a sewing tutorial to the culottes that was posted on my own blog, click HERE


I will hurry up and admit that these culottes are a GAP knock off. 
Here you see the 'original' GAP culottes.

Tutorial:


1) To make the pattern I started thinking whether I already had a pattern I could use as a base for these shorts and I was in luck. Do you remember THESE shorts? The pattern for those shorts is what you see above. What you need to use this tutorial is any pair of shorts with an elastic waist. So to make the culottes we need to add much more width in the legs - kind of logic, right!

2) It is obviously a big help to have the item you are copying liking so much that you want another one, in your possession. I measured the GAP culottes and compared it to my base pattern. I started by adjusting the side seams, then the curve of the waist and finally elongated the crotch seam.  

3) What we have done up to this point is added width to the crotch area and we obviously want width in the whole shorts leg. And the way to get that is what you see above. I needed to add 8 cm / 3.1 in to the back and 9 cm / 3.5 in to the front pattern piece. If I would have needed to add more width I would have cut up the pattern more but for these numbers I only cut each pattern 3 times. You cut all the way up until there is like 1 mm (in inches? Very little ;-) left and then spread the pattern part till you get the desired gap (you can see the numbers on the photo above). 

4) Then you fill out the gaps by putting paper under and draw your new and now curved lower shorts edge with lots of width and you are now ready to cut and sew your culottes.
I have put on the measurements on the pattern parts for a size 3T* on the photo above and I hope you will be able to make them yourself. 
Please note that the measurements above are WITHOUT seam allowances so please add that in the drafting process.
*You might wonder why I am showing you a pattern for a size 3T and then showing you photos of my 4.5 year old daughter who use size 5T. Weeeell, ideas has been flowing between Justine and I and originally I made a pair for my 2.5 year old who uses size 3. In the end we decided to focus on the (reversible) pair that Wilma is showing below. Don't worry though I will show Evelyn and her pair of culottes next week. (you can see them HERE).
Since I also own the GAP culottes in size 5 (yes, at least I did pay for the product and then copied liked so much I had to make more) I compared the size 3T and 5T and the only difference was the length of the legs that was 1.5 cm / 0.6 in longer than 3T. I decided to extend them further and make them 3 cm / 1.2 in longer than size 3T. Otherwise I kept  them exactly the same.

Click HERE for part two of this post that focuses on the sewing.

Thursday, May 30, 2013

Skirt Week 2013 - How to draft a custom fit skirt pattern with a wide waistband.

Okay, ooooookay first of all YAY for Skirt Week 2013.
If you have no idea what I am talking about I would suggest you check out THIS post at Crafterhours because that explains it all. But come right back because you don't want to miss this post, okay!

A year ago I participated in Skirt Week for the first time and I got the surprise of a lifetime. First of all I got pretty surprised that one of my skirts was chosen from the Flickr group to actual go to voting. Then I got not-so-surprised when my skirt got like the lowest number of votes (yeah, thanks for nothing guys ;-))) BUT I guess the judges felt sorry for me or something because (and now comes the surprise of a lifetime-part) then I won Judge's Choice for THIS a-line skirt. Whaaaaat, man I am still so proud of that. 
And now I almost feel like I won something again by being invited back to do a tutorial to (hopefully) inspire others to make skirts. Thanks Susan and Adrianna from Crafterhours who arrange Skirt Week!

So I was thinking how can I help and inspire the most and my answer (which is not necessary the right one but never the less my answer) a tutorial on how to draft a custom fit skirt pattern with your own measurements (hence custom fit...but you know......) 
The skirt I am going to show you how to make is a (kind of) half circle skirt with a wide fitted waistband. 
A wide fitted waistband is a great tummy control type of waistband (pretty sure I learned that word from What Not to Wear (when they teach them what to actually wear....not when they basically break them and their wardrobe down in the beginning!). AND a half circle skirt is great for thigh disguise (yep, totally made that word up myself).
In other words I am making a skirt that would look good on a lot of different female body types. And you don't actually have to have a tummy or thighs that needs any disguising to look good in the skirt. Juuust saying!!!

In the end I will show you a skirt I made using this method with my measurements. But the possibilities are really endless with this model so lots of chances to use your creativity.

First we need 4 measurements....let's call them A, B, C & D.

A: Circumference of your stomach/waist area where you want the waistband to start. Generally (on post teenage years people) this is like 1-2 in./2.5-5 cm below your belly button. But YOU decide remember! Do what looks best on your frame and what you feel most comfortable with.   

B: The height of your desired waistband. I made mine 3 in/7.5 cm.

C: Circumference of your low stomach/high hip area where you want your waistband to stop. You get this by: start where you measured A, then measure down with the B that you decided and at that spot you measure the circumference and you got C.

D: From C to your desired length of the skirt. I choose just around knee length and ended up with 20.5 in/52 cm.

Along the way you need to make some Kindergarten level calculations....you will be juuust fine!


 Now that you made your muslin, tried it on and made the changes to the skirt and waistband pattern (if there were any) you are ready to draft the pattern for the lining....if you want lining in your skirt. I kind of prefer not - especially in summer skirts - but some of my fabric for the finished skirt was a bit sheer so there was no way around it.
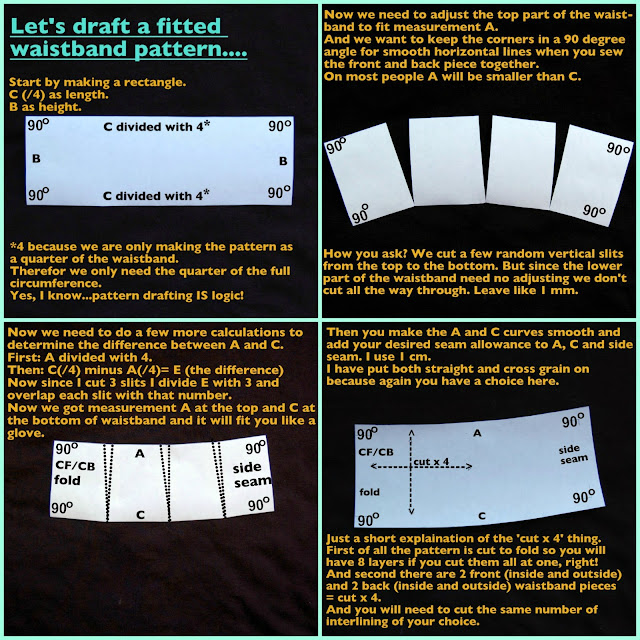
1) You use your skirt pattern but you don't need it as wide as the actual skirt. So what do you do? YES, you use same method that we used to make the waistband more narrow to fit measurement A
But because you don't want to cut in your finished paper skirt pattern you simply just fold it somewhere in the middle. Why do we not just take it off from the side seam? Because then we would loose our 90 degree angles which are so important for the finished 'lines' in the skirt. Try to sew something together with a 80 degree angle and you will see what I mean....it will be pointy not a straight line.
I have already made the fold on this 1) photo between the dotted lines.
The top curve (that is going to be sewed on the bottom of the inner waistband) will become a bit pointy when you fold (those pesky angles) so when you copy the pattern you will need to smoothen that out. See yellow dotted lines on photo 1).
2) Here you see the copied lining pattern with a smooth top curve and still all 90 degree angles. Since you copied your skirt pattern that already have seam allowance you don't need to add that. But you do need to shorten it so it does not stick out under your skirt fabric. It shortened it so it just covers the sheer fabric but again that is up to your skirt design.
3) This photo is just to show you how to sew the inner waistband to the lining. When you, in the very end, sew outer waistband (with skirt) and inner waistband (with lining) together  - right against right side of fabric - at the top waistband seams, you will get a skirt with no visible seam allowance - at least when you look from the top. Since the skirt and lining does not have same length and width we obviously does not close it by the hems.

And now I think it is time to see that skirt I made, right!


A curvy/wavy color block skirt made with three different thin cotton fabrics that all have a great drape which is kind of important in this type of skirt.
In case you are interested in an actual sewing tutorial for this specific skirt I can tell you I have plans of making that too in the near future. So keep an eye on my blog and if you are a new reader visiting from Crafterhours (welcome!!) maaaaybe you should consider following me with Facebook, Bloglovin or how you prefer to follow blogs! Whatever you need for this is in my right side column.

Now go make your own skirts! (Told you I can be bossy!)

Monday, May 28, 2012

Cotton summer skirts.

Over at the blog Crafterhours Skirt Week 2012 (which really is a month but who is counting) is in full swing and that made me think about what skirts I have made lately. And my next thought was that they would be kind of perfect to show here on the blog so here we go.....
It is basically the same skirt in two different fabrics and with the only difference that the orange is fuller than the leopard and the leopard has deeper pockets (which you can't see from the outside but they fit my long monkey arms better).


I made the orange one first for a vacation in Florida earlier in the year and even though I was happy with the result (except for the not deep enough pockets) my original idea was a skirt less full.....and that is where the leopard one comes in the picture because that was the next attempt. 
The orange fabric is 100% quilting cotton from Kaffe Fassett Collective 2010 Dapple Orange. The leopard fabric is a crispy cotton poplin (both bought a www.fabric.com). 


The model itself is very simple - if we can just forget the pockets at first (and still with pockets is it a project a new beginner could do). Basically two rectangles sewn together, gathered and sewn on to a bit smaller waistband. Divide the waistband into 4 casings/canals, put elastic in at a length that fit the place you want to skirt to sit (waist, below waist etc) in the 3 bottom casings, hem the skirt and wupti you are done. 
And no this was not a full tutorial. It should be enough though for a more experienced sewer to understand what to do when they get the measurements later in this post. If you are a not such an experienced sewer (and you are very welcome here too) I would recommend you to go to this very talented lady's website: Marapytta. It is in Danish (because Line is Danish and live in Denmark so I guess that is kind of fair enough.) BUT the DIY I am going to tell you about has brilliant photos and you should be able to figure it out from them. 
It is this DIY that taught me to make the waistband a bit smaller than the skirt piece in skirts with elastic waists because then you are dividing the gathering better by using both gathering thread which will be fixated when you sew the waistband on the skirt and elastic that gives the waistband flexibility. Clever! 

A closer look at the elastic waistband and front pockets. A piping along the pocket opening would be a nice detail by the way.


The orange skirt has a finished bottom circumference of 210 cm (82.6 inches). The leopard is 150 cm (59 inches) all the way around. This still gives plenty of gathering at the waist and room to take steps without need of a slit but it does have a less full look. I like and wear them both for everyday life but my favorite at the moment is the leopard one. Which one is yours?


Yeah I know what you are thinking....she should have ironed her skirt before she took photos (I know I would!) .....and I DID iron it! But like I mentioned before the fabric is kind of crispy (like nice bedsheets) and lazy me are throwing garments like that in the tumble dryer and that has given it some crinkles that does not go away...at least not with my household iron. Oh well it is an everyday cotton skirt and my everyday can take some crinkles.


Last shot from the back of the skirt.....and of the fence that needs painting. But we are still expatriates and are renting this house so not our problem - phew!

Because the skirt itself is so simple I would definitely recommend to make a big hem like I have done on these two skirts (9+1 cm (4 inches)). It is one of those tricks that makes your garments look more exclusive and nice simply because of that extra fabric that has been used. An extra bonus is that that is very easy to do in a skirt that has a square pattern/starting point like this one. 
If you were making a skirt from a circle pattern you would have to make a separate facing to make a high hem like this because well that is simple mathematics (even though it is going to sound complicated in writing, sorry!)....the circle's circumference is much higher on the outside than further up on the circle where you have to stitch the hem to the skirt. Got it? I hope! Otherwise forget about it because this skirt's hem is straight and therefor you simply add whatever length of hem you want to the pattern. 
And the tutorial for this hem is fold, iron, sew, iron, done!

Okay so since I just posted a detailed full sewing tutorial for this skirt I thought that I would focus more on the pattern in this post.

Here you see the back skirt pattern piece. This pattern piece is made 'to fold' which means the CB (center back) will be where the fold is and the piece of fabric you cut after this pattern will be double size in the width. To do it this way is simply just a way to save paper  and you can of course only do it to patterns pieces that are symmetrical. 

Here you see the front skirt pattern piece. This also has to be cut 'to fold'. You can make your side pockets round or straight or square (Yippie, more options!)
When you decide on your type of pocket you draw the line and then add the sewing allowance you sew with. I use 1 cm.

 
Before you cut out your pocket opening on the front skirt piece you have to make a what I call a back pocket bag. This pattern piece is going to fill out the front skirt piece so that it becomes a full rectangle again - you are going to cut of the corners for pocket openings remember. 
By the way you can see here that I have extended the pattern for the leopard version so the pocket became deeper.

Here you see the front pocket bag pattern. This is made by tracing your pocket opening and then trace the back pocket so the front and back pocket is the exact same size.

Last pattern piece is for the waistband. Again I have made this 'to fold' so what you see here is half of the fabric piece you are going to end up with after cutting. By the way you need two pieces - a front and a back.

Some measurements would probably help the project along too.
Since this skirts is made of big rectangles that you gather together with elastic the only measurement that has to fit you precisely is the length of the elastic you put in the waistband. And the length of the skirt.
I am a size 38-40 (US: 6-8) and I should mean this skirt could be used for size 34-42 (US: 2-10) - with different length elastic in the waistband. 
I am 178 cm tall (5"10) and I have made the finished skirt 61 cm (24 inches).

I will give you the measurements of the pattern pieces as you see them on the photos above. 
Remember the patterns are made 'to fold' and you have to multiply with two to get the full front (or back) width and four to get the full skirt's or waistband's circumference. 

Front + back skirt (orange - fuller skirt): 
Width: 52.5+1 cm = 53.5 cm (width, skirt+seam allowance)
Length: 1+56+10 cm = 67 cm (seam allowance, top+length skirt+seam allowance, hem)
Front + back skirt (leopard - less full skirt):

Width: 37.5+1 cm = 38.5 cm (width, skirt+seam allowance)
Length: 1+56+10 cm = 67 cm (seam allowance, top+length skirt+seam allowance, hem)

Front + back waistband (orange & leopard): 
Width: 29+1 cm = 30 cm (width, waistband+seam allowance)
Height: 1+5+5+1 cm = 12 cm (seam allowance+waistband, outside+ waistband, inside+seam allowance)

The pockets are obviously hard to give measurements to because of the round lines but I will give you the width and height of the pocket bag and then I am sure you figure out the rest. Besides even the height and width will depend on what type/style of side pocket you decide to make.

Front and back pocket bag (orange & leopard): 
Width: 1+16+1 cm = 18 cm (seam allowance+pocket+ seam allowance)
Height: 1+32.5+1 cm = 34.5 cm (seam allowance+pocket+ seam allowance)

If you are wondering why the measurements are only in cm it is because I still do not know what you Americans are using as seam allowance but I can recommend www.metric-conversions.org. Please let me know if I can help in any way!

Okay, I think we are through here.

This skirt is only for private use.
Happy sewing!