Showing posts with label Children leggings. Show all posts

Thursday, April 6, 2017

Coffee + Thread Tour

Yaaaaay, it's time for the Coffee + Thread Tour!
We could use whichever of Olga's patterns we wanted. In this post I used four patterns. All hacked one way or the other. Some quite a lot and some just a little.

Tuesday, May 24, 2016

Wild and Free Lounge Pants by Coffee + Thread Patterns

You should think my daughter read the pattern description of these pants because it says they are 'designed with an active child in mind' and I do not have a single shot with a still pose in this post, ha perfect.

It's the Wild and Free Lounge Pants from Coffee + Thread Patterns I'm talking about.

Monday, December 14, 2015

All You Need Jammies - Christmas pajamas 2015

Two christmases ago I made these ladies their first christmas dresses and this year I took the plunge and made them their first christmas pajamas.

It's not a tradition I grew up with - probably because Christmas Eve is the big event in Denmark with christmas dinner, dancing around the christmas tree and then finally presents. In other words there are no specific morning traditions.
I love love love the American/British way with presents in the morning and this year it will finally happen in mommy mades. 


And the name of the pattern is to be taken literally.
From this pattern you can make 5 different garments. Gathered and regular tee, leggings and lounge pants plus a gathered nightgown. 
That's impressively generous for little over $8 if you ask me!

And even better the pattern has an easy overview to which pages to print depending on what you need. I love patterns that do that. 


But before I talk more about the pattern, let's talk about this fabric!

There isn't a ton of cotton based knit fabric out there and even less with prints in my taste so I practically jumped when I found this Boxer Reindeer Jersey Knit at the peek-a-boo pattern shop that-now-also-sells-fabric. 
I asked Amy the owner if this would work for pajamas and I LOVE that she was honest and said, "It can be done but personally I think it is a bit too thin for the pants. What about using this great red knit, it would be perfect for pants." I had not even thought of that and I honestly think this is a much better result than the whole outfit in the reindeer print. Thank you SO much for perfect customer service and lightning fast shipping!

The Reindeer print does not have a whole lot of stretch either so the gathered top in this pattern package was oh so perfect.


I feel like these photos are a bit unfair to the fabric. They are taken in the afternoon after the kids had been wearing them since the morning and I don't think you can find much knit that would not have 'knees' in them at that point. We had even been trampoline jumping at this point, haha. It really is great for leggings, promise!


Okay, let's get back to the pattern.

Sizewise the pattern is big - which is not meant as a complaint but just a reminder that you in this case REALLY have to measure your child or do what I did, used an already fitting pajamas to compare the pattern to get an idea of what size to make.

The clear indicator I got that the pattern runs big was when I realized that my tall (90 percentile) almost 6 year old could fit the size 5 (also in length) in the leggings and top. Again, not a problem as long as you remember to measure.

What I do not recommend you to do though is to use a top with lots of stretch to determine size and then afterwards realize that the fabric you are using has little stretch, DUH! 
I had already cut out my size 5 top pattern and went totally rogue and sort of graded it up while cutting...sooooo if you noticed a little center front and back pleat on little sister's neckline you should know that is me fixing my own problems and not a problem with the pattern, ha.

When it was big sister's turn (almost 8 years old with average height and weight) I had (kind of) learned my lesson and made her the size 9/10 in the top (because of limited-stretch fabric) and ahem, then I might have used the size 5 leggings patterns and added a bit of width and length while cutting (at least this time it totally worked....seriously, sometimes 15 years of sewing experience have to pay off, right!?) 


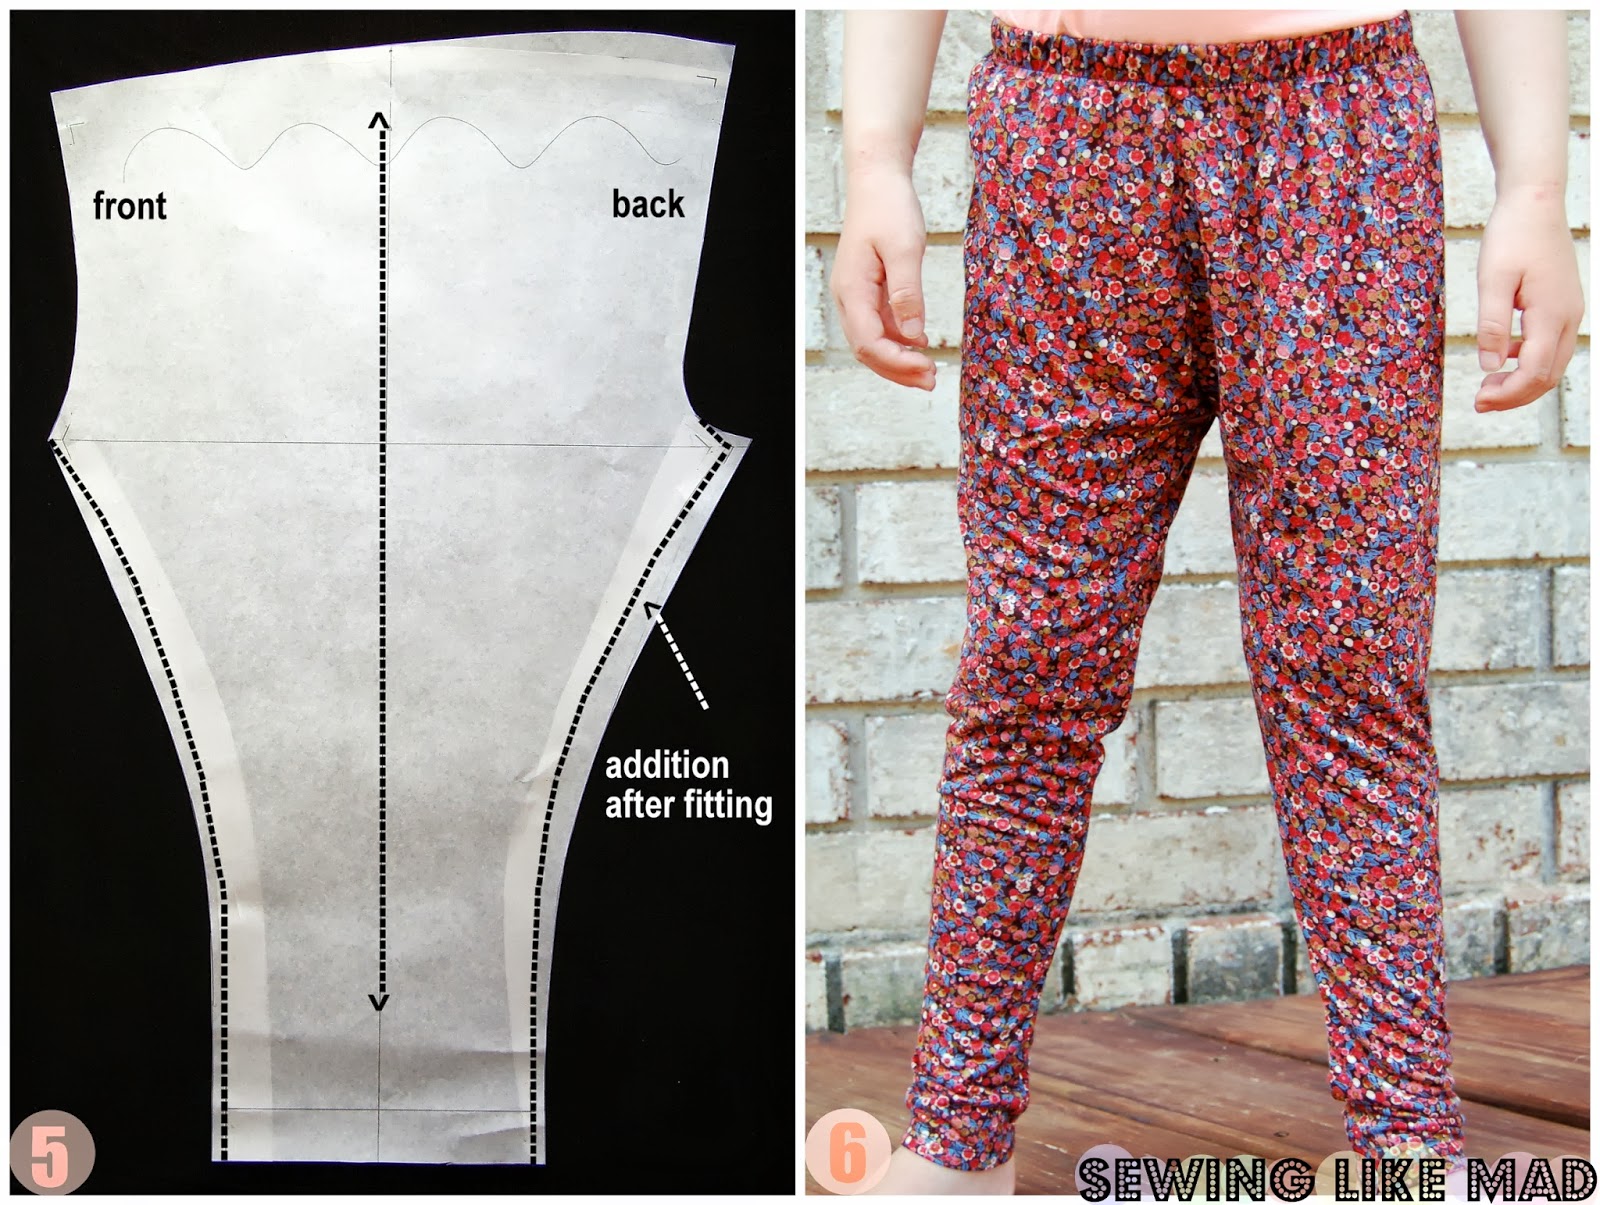
I had a few problems with/comment to the patterns.

You know I from time to time measure my paper patterns before I even start cutting and I found that the sleeve is a bit too small for the armscye. It's not something you would notice when you are sewing it because the fabric stretch and you might not even notice it when it is sewn in unless you have a trained eye (or you saw a comparison between a sleeve that fit and one that is too small) but the feel from the wearer will for sure improve and so will the look if the sleeve fit.
An easy fix is to simply add a bit of width to the sleeve seam and maybe also raise the sleeve cap a tiny bit depending on how much you know about pattern drafting. Or maybe using a sleeve size bigger than your bodice would actually do the trick if you don't feel like doing any changes to the pattern.


Another small thing was the gathered pattern piece (the lower part of the bodice of the tee). It is shaped like a half trapeze shape which means when the side seams are sewn together it creates a pointy side seam. I know I'm anal here and most would just cut it off and make a straight line at the hem but I can't help thinking that if only the pattern piece had been made from a rectangle piece and then using the cut and slash method which keeps the corners in their correct 90 degrees state then no correction would be needed.
I did my little trick and raised/curved the top and hem seam gradually to about 1 cm / 3/8" towards the side seam and created those pesky 90 degrees corners that creates straight lines when you sew them together.

A third thing is the fit of the leggings on the front of especially my youngest (who wear the true size 5 pattern) but I must admit I didn't spend any time looking into possible fixes because hey, this is pajamas that they will sleep in under a duvet, ha.


My Janome Coverstitch was again hard at work and I used it both at the neckline rib, above the chest gathers and to hem the bodice and sleeves. 

And here is a closer look at that silly reindeer.


This photo might be a bit blurred but how could I not use that!? It's funny how photos (or looks on photos) can deceive because they they were craaazy during this first attempt of getting photos hence why we ended up jumping trampoline and only try again outside way later in the day but hey it all worked out in the end.

Get your own version of All You Need Jammies pattern HERE.

Thank you and happy holidays!

Monday, August 26, 2013

Sew Many Books - The Fashion Version.

Okay, this title requires a bit of explanation!
Today I am over at Nap-Time Creations as part of her Sew Many Books-series. 
Nope, I am not going to tell you which book I have chosen....You have to go look for yourself of course, hehe! And if you actually are coming from the book-post: Welcome!


But what I will tell you is that I struggled with this challenge. Make an item of clothing after a children's book. Why did I struggle? Well, I am not much of a costume person (that is just me - nothing wrong with people that like sewing costumes, okay!!). I like to sew things that are being worn a lot - that is probably why I don't enjoy sewing big party dresses either. I am en everyday clothes kind of person. Soooo what to do? Make the book's character's clothes into something more wearable of course. 
The character is wearing a yellow shirt with 4 big different colored buttons - yeah, that would probably not be worn again, ha!
I found this shirt in the Japanese pattern book Girls Clothing by Akiko Mano and that fit the bill with button placket, collar and collar stand.
I did some changes to the pattern but will not repeat them here since I am telling about them in the post at Nap-Time Crafters.

The fabric is a neon lime green cotton corduroy (Kaufman 21 Wale) and the dot is THE neon dot from Michael Miller that I already have used on SO many project so far and absolutely love. I bought mine at Michael Levine remember?!


After the photo shoot for the book part of this post I removed the big colored buttons that I had just sewed on slightly and with no button holes.
And changed them into these beauties - oh the stripy buttons - from Lots of Buttons.
I absolutely love them.


The pattern has pockets and since Wilma suddenly requests pockets in everything I knew I had to keep them. And I used the dot fabric to create a contrast with them.


I also made some matching leggings. I really did try not to make the outfit too matchy matchy but arghhh it is definitely my weakness. I mean I had this lime knit that just matched the corduroy from the top peeeeerfectly. AH, I could not help it!
You can read all about these leggings and see a lot of other versions in THIS post.


And last but not least I also had the pleasure of a model with attitude. Jeez, those 5 year old ladies.
Don't worry no Mommy/photographer got hurt in this session - it is just a leaf from the tree she is throwing at me - I guess we are done then! Tsk tsk tsk.

Thank you for coming by.

Follow on Bloglovin


Tuesday, August 20, 2013

From leggings to slouchy pants. Easy pattern alteration tutorial.

This month we decided to divide my Sewing Rabbit Creative Team post up in two parts.
On Me Sew Crazy you can get some tips to rethread your serger and unpick your serger stitch the absolute easiest way. If you do not already know these simple tricks they are going to blow your mind (I hope, haha).

And here I am showing you how to with a few steps can transfer your leggings pattern into a pair of stylish but still super comfortable knit slouchy pants. 


Before we start the tutorial I just want to add that it is a 'real time' tutorial so I actually ended up with two fittings and extra adjustments before I was satisfied and you are getting it all in the photos below.


1: Start with a basic legging pattern. This one self drafted. But there are several great tutorials for self drafting leggings out there in blog land. THIS one from 'One Little Minute' is very detailed. And THIS one from 'Make It and Love It' is the fast one where you trace another pair of leggings. And if you are not the self drafting type then 'Go to Patterns' have their bestseller Go To Leggings pdf sewing pattern for sale at their web shop HERE. In other words lots of options!

2: The first thing you do is copy your leggings pattern because you have to start cutting into it to add the width. Because I only wanted the width in the thighs I first cut of the pattern around the knee. Then I made some vertical cuts in the top part all the way down to the knee line so that the paper only just stays together with like a thread. And then I spread out the pattern as seen above on photo 2.


3: Then you trace the new shape to a new piece of paper. Don't worry about the curve that happens to the knee line when you spread out the top part. Just reattach the lower knee piece to the spread out top part like photo 2 shows - so the sides are touching. To lower the crotch seam we have to make the crotch seam longer, right! So I am adding 3 cm ( 1 3/16 in ) to the top of the pattern as seen on photo 3. That is much easier than lowering the bottom front and back seam and the result is in my opinion the same.

4: Now I thought I was done and sewed up a sort of a wearable muslin - if they were good that is! 
Hmmmm, I was not completely satisfied but I knew I was going in the right direction. The width in the upper thighs was right but they were too tight around the knees. I only wanted them to be tight under the knees. 
As a side story this first version ended on my three year old. Since she has shorter legs the thigh width fitted her perfectly (get it? The distance from top to knees are shorter, right!). They are of course too long in the full length but with a few roll ups (or an alteration if Mommy would ever get around to that (don't think so)) and they are good to go!   

Okay, carry on now Mie......


5: Here you see what I added to the pattern after the first fitting. I also thought they needed a bit of extra length only in the back crotch seam (sorry, I have no photo of that so you just have to take my word for it.) but since I was already adding to the thigh width I also added a bit to the back crotch seam. In the front I only added to the thigh, knee and a tiny bit to the lower leg.

6: Time for second wearable muslin and this time I was satisfied.


7: I wanted to add pockets to make them more pants alike. So I simply traced my pattern again. This time making a front and back pant pattern piece by simply splitting the pattern at the seam side - just remember to add seam allowance. If you need help to draft a side pocket pattern I have made a tutorial for you right HERE

8: DONE! These are made in this really soft grey cotton jersey with tiny silver dots from Girl Charlee - seriously where else, right!


That is all for me today. Thank you!

Follow on Bloglovin

Sunday, April 7, 2013

Leggings bombardement.

Okay, I might have went a little overboard but they are kind of fun to find color combinations for.....AND the kiddos needed leggings (well not any more thanks to freak Mom!).
I am sure you remember THESE pants...and I have already made them in a skirt version and then the other day (when I was thinking that it was too bad W was not wearing them that much) it hit me that a legging version would be way way more practical. My kids, like most kids, LOVES leggings.
I already had a previously made legging pattern for each of them so it was just a matter of putting on the lines and then trace AND add seam allowance (yes, Olga that was for you my friend ;-) to each piece individually.
And choose, cut, sew, (photograph if you are a blogger) and done!


Any favorites?
The match the top version is by the way another sneak peek of my second item from a Japanese sewing book. Such a cute cute top.
Stay tuned! 


Thursday, May 3, 2012

Project Run & Play, week 4 - pick a color!

You already know that I was going to make another entry to Project Run & Play's sew along competition. The week's challenge is pick a color and make an outfit.......and here is the result.
I choose the color group RED (no, not because I knew even my little models hair would match) but somehow that was the color (along with blue) that was best represented as solid colors in my fabric stash. I still did end up at Jo Ann's for the fabric for the skirt (and ended up buying five other fabrics) but you know that's what happens.
I made color block leggings (that you have been presented for in this post) and 25 min. before I had to pick up Wilma from preschool today I made them more narrow and they now looks the way I originally intended. A jersey cardigan/blouse with snaps and belt in same fabric and colors as the leggings. And to give some contrast to the slim fitting and tight woven jersey I made a layered, airy and fluffy skirt with an elastic waistband in a shimmery thin polyester (yeah I know, yikes polyester. But it gave the outfit the look I wanted so I will let it pass for this time :-) (yes, I can be a snob that way I know, sorry!)
I was from the beginning very aware that I did not wanted this to be a costume - which can very easily happen when you have to follow some rules you don't normally have to. But even though it IS very matchy matchy and she looks very dressed up (not the party-dressed-up-way but the too-organized-color-coordinated-way) I am happy with it. I have NO expectations of winning though....see why in the end of this post!


The cardigan is a kid's version of a model I had in one of my collections when I had my women's apparel company in Denmark like six years back and I will for sure make that one in other colors and a printed fabric instead of the light pink would also work very well.

Oh look I went through my box with all my old business stuff and found a photo of the original cardigan. I have made the pattern and sewed this salesman sample that we used for this photo shoot.
What a lot of memories that photo brings. Lots of very hard work and constant money troubles but also a great joy to be able to execute many of my fashion ideas - even though the work with new designs was always under time pressure because so many other things came first - it was such a small company that I did most of the jobs. 
And not to forget the extreme happiness when a shop bought my clothes or even better if I saw a girl in town with my clothes on - ohhh, then I immediately forgot all my troubles....for at least 10-15 minutes.

From my spring/summer 2006 collection from my now closed company Pilborg.
Photographer: Kasper Thye. Model: Julie F/Unique. 
I promise I will come back with more posts about my fashion past but let's leave it for now.

No, I did not forget about the no expectations explanation (wow, try saying that ten times!) 
Yesterday I checked out the entries that have come in so far in the Flickr Group (the deadline is friday morning 8 am/EST) and WOW check out this entry from the blog Sew Chibi. Now you understand why I have NO expectations. What an amazing job she has done!

Monday, April 30, 2012

Color block leggings - tutorial.

I have been debating myself whether to save this part for a monster post in the end of the week or dividing it up a little as things get ready....as you can see I decided for the last option.
I'm going to try the sew along competition in Project Run & Play again this week - this time with fewer expectations :-) 
The theme for week 4 is a color challenge: pick a color and make an outfit. 
That is a BIG challenge for me for several reasons. I rarely make a piece of clothes in just one color and even more rarely do I put a whole outfit together in the same color. As we have already established I LOVE color blocking and I have decided that picking colors that come from the same basic color must be okay.....pleeeeaaase!
As you have probably guessed from the headline it is the leggings you have to focus on in this post....and yes the color I have choosen is RED.
I got the idea for these leggings a while ago and then I forgot about them again (does that ever happen to you?) and when I was thinking about what to do for this challenge they popped up again. They worked out almost as they looked in my head. The inspiration is a tuxedo pant but with a wider band down along the leg. I made them from my usual legging pattern (see tutorial further down) and one of those classic mistakes when you work with knit fabric happened....there was a lot of stretch in the fabric and they turned out not so tight as I wanted them. But when you are sewing when the kids are in bed you sometime ship a fitting you should have done - yeah yeah next time, right!!


Grumpy kids. By the way Evelyn is wearing Oliver+S Hopscotch Skirt


Color block leggings - tutorial.

A little design process.
My usual legging pattern with the lines drawn on for the side band. Because leggings are  always made with stretch (and usually knit) fabric you don't need a side seam. The line you see in the middle of the side band is where the side seam normally would have been in a normal pair of pants.


The pattern is now divided in a front, mid and back part and seam allowance has been added. I'm adding 0.75 cm for patterns that I sew together on my serger/overlocker.
Notice the notches I have circled in. It's a little help to yourself when you are sewing to make sure that it's the right parts that are sewn together. 


The two different fabrics has been cut and the three pieces has been sewn together. Just to be clear you need another one of these for the other leg. So you cut two of each pattern piece with the fabric lying right against right (or wrong against wrong - does not matter in this case.)
I have chosen to iron the seam allowance against the light pink band so from the front it will look like the middle band stands out a bit. See next photo.

See what I mean?! Okay maybe not...but you will in real life.

Here we are with both legs and the inner seam has been sewn too. You iron the inner seams towards the front - that gives a nicer visual.
Crotch seam has been sewn.
Trying to decide which fabric to use for the lower leg ribbon.
Went with the bright red. To the left you see the ribbon sewn on the leg from the outside. The right side is the inside look.
Divide your elastic for the waist in four equals and do the same with the waist on the leggings.
The legging's waist are going to be bigger than your elastic and when you add your quarter marks of the elastic to the quarter marks of the legging's waist you make sure that the elastic is divides equally on the fabric.
The elastic has now been sewn on to the legging's waist.

Bend the elastic down one time and stitch from the inside the elastic to the fabric. Remember to stretch the fabric while you sew otherwise the stitch will not be 'stretchy' and will break the first time someone is trying to put them on.
Sewing an elastic to knit fabric like this is not super super pretty and professional but in my opinion the best and easiest way to do it when you only have a household sewing machine and serger/overlocker.

DONE!